I got a little carried away whilst building my 2012 Z77 LGA1155 PC and had an itch to build a Z97-based LGA1150 system with a target year of 2014.
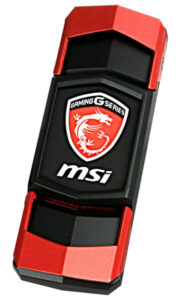
After researching what motherboard to get, I hit on the idea of building a PC with as many MSI-branded components as possible.
MSI didn’t make CPU coolers in 2014 (their first air cooler was in 2016 and the first AIO was in 2020), and likewise they didn’t enter the PSU market until 2020 either. And they didn’t launch their first MSI-branded ATX case until around 2018/2019. So really this was just going to be an MSI motherboard and MSI graphics cards. Yes, cards, because I wanted to do an SLI build.
My initial purchase was a bundle consisting of an MSI Z97 GAMING 5 motherboard with I/O shield, i7-4770k CPU, 16Gb RAM, and a 120GB M.2 SSD, for a very reasonable £78.90 but unfortunately this turned out to be defective. The seller asked me to return it at their expense and I received a full refund.
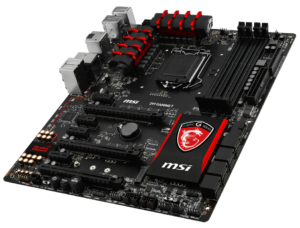 I then found a top of the range MSI Z97 GAMING 7 motherboard with I/O shield and an Intel Core i7-4790k CPU, including boxes, for a rather eye-watering £165.11 (I think I might not have been entirely sober at the time). The next day the seller contacted me to apologise that they had actually sold the CPU and would I accept a refund of £50 for its absence. Ordinarily I would have been quite reticent, suspecting a scam, but I know eBay’s Buyer’s Guarantee would have me covered here so I accepted. And, true to their word, the seller immediately refunded the promised amount which assuaged my fears somewhat. It was actually £52.23 that got refunded, incidentally, presumably because eBay added a partial refund on the Buyer’s Fee.
When it arrived there were some welcome original accessories in the box, like the original driver discs, some cables, the audio power adapter, the M-Connector, and an SLI bridge, but what was missing was the I/O shield. I contacted the seller asking if they had perhaps left it in their PC case by accident and they confirmed that they had and that they would post it to me immediately via Royal Mail Tracked 24, at their own expense. And, again, true to their word, they did and it arrived quickly. Phew!
Of course, I needed to buy a CPU since the promised i7-4790K was not included after all and I managed to find an i7-4790K for £38.16 including postage.
For a cooler, I used one of my Cooler Master Hyper 212 EVO air coolers that I have in stock.
Although this is only a budget cooler, it was still well-regarded in 2014 and is period-correct. Premium coolers from 2014, such as the Noctua NH-D15 or the Be Quiet! Dark Rock Pro 3, go for silly money. Especially the Noctua. So, rather than just spending money, why not just use what I have? As with the Z77 build I spray painted the top plate black.
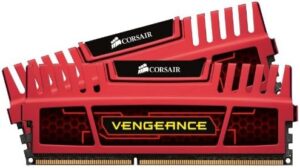
There was no RAM included in the bundle, but I have plenty of DDR3 in stock so selected 16GB (4x4GB) of Corsair Vengeance PC3-17066 2133MHz with red heat spreaders which matches the aesthetic of the motherboard. The motherboard will support faster RAM than this but this is sufficient for now. As with the cooler, why spend money unnecessarily?
Although the motherboard supports an M.2 SSD (in either Gen2 x2 NVMe mode or in mSATA mode), it’s quite difficult to get such a SSD that dates from 2014 and I didn’t want to fit a more modern one. Indeed, consumer-grade NVMe M.2 SSDs weren’t even available in 2014 and came later, and mSATA ones are no faster than just using a SATA port. 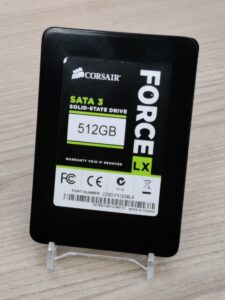 Instead I used a Corsair Force LX 512GB SATA SSD that I have owned from new and which dates from June 2014. Again, best to use what you have if it is suitable.
The PSU I chose was a Corsair HX850i [75-010582] CP-9020073, with is an 80+ Platinum modular PSU from mid-2014. In addition to being an extremely good PSU, it can be configured as multi-rail which means that by doing so each graphics card in an SLI configuration can be exposed to a maximum of 425W rather than the full 850W.
Initially I went for a pair of MSI nVidia GTX 970 Gaming 4G OC Edition graphics cards, which I bought back in November 2025 and I have been hanging onto for this build. One was boxed, and the other was sold as “For Spares or Repair” but with the promise that it did work but one fan was broken. I knew I had a dead MSI nVidia GTX 970 Gaming 4G from a Job Lot, which had working fans. And once the card arrived, I could see that, in addition to the broken fan, it also had a big dent in one of its heat pipes and was a little scruffy, whereas the heatsink and shroud of the dead card was in much better condition, so it was trivial to simply swap over the entire heatsink, fans, & shroud and that yielded a fully working card in good condition.
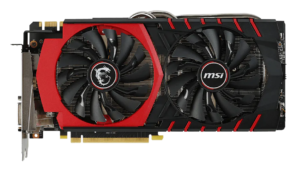 However, as I began to build the PC here now in April 2026, I asked myself why I was using GTX 970 cards when I could be using GTX 980, especially since I had run an MSI nVidia GTX 980 Gaming 4GB Twin Frozr V OC as my main card back in 2014.
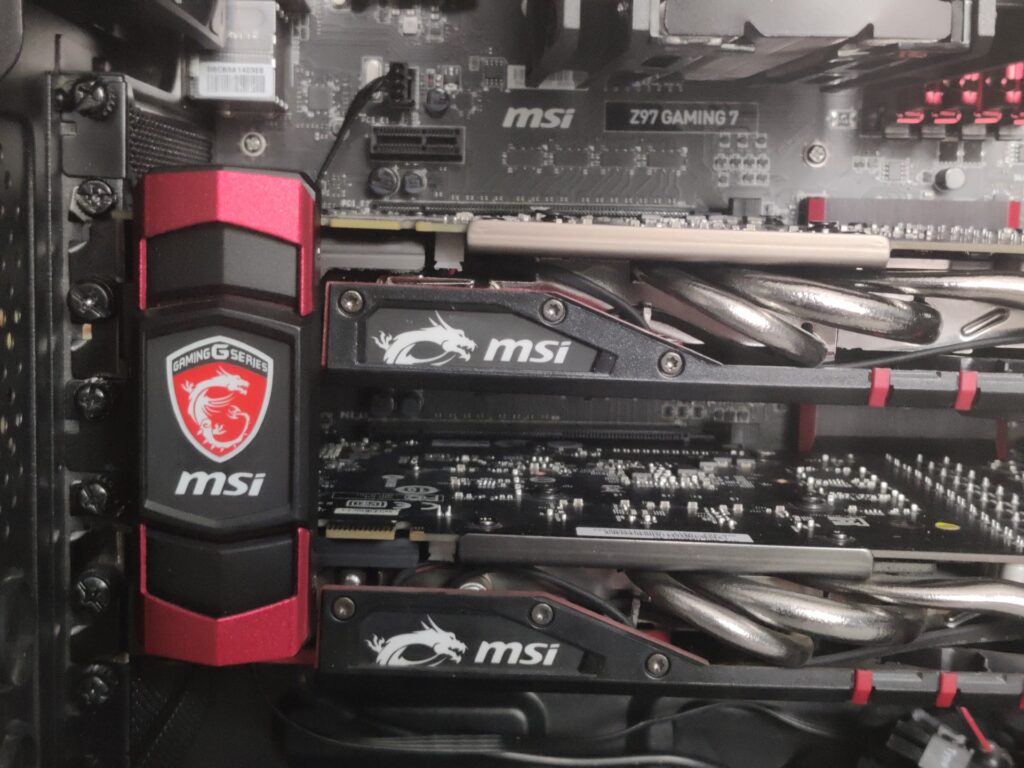
So it was off to eBay where I managed to bag two MSI nVidia GTX 980 Gaming 4GB (non-OC) cards at prices that I considered to be not unreasonable.
Fortunately for me, the motherboard does not support 3-way SLI (although it does support 3-way Crossfire) or I might have been tempted to go overboard. 😉
The two GTX 970 cards can simply go back up for sale as part of my little business.
 I would also need a SLI bridge. I do own several flexible ones, including the one that came with the motherboard, but I really want the visual flair of the MSI GAMING rigid SLI bridge. These are rather expensive for what they are, and don’t come up for sale very often, but they do look amazing especially as they have built-in LED illumination and are specifically designed for these cards. I will just have to keep my eyes open for one, and use the flexible one that came with the motherboard in the meantime.
Now to decide on a case.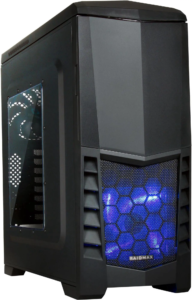
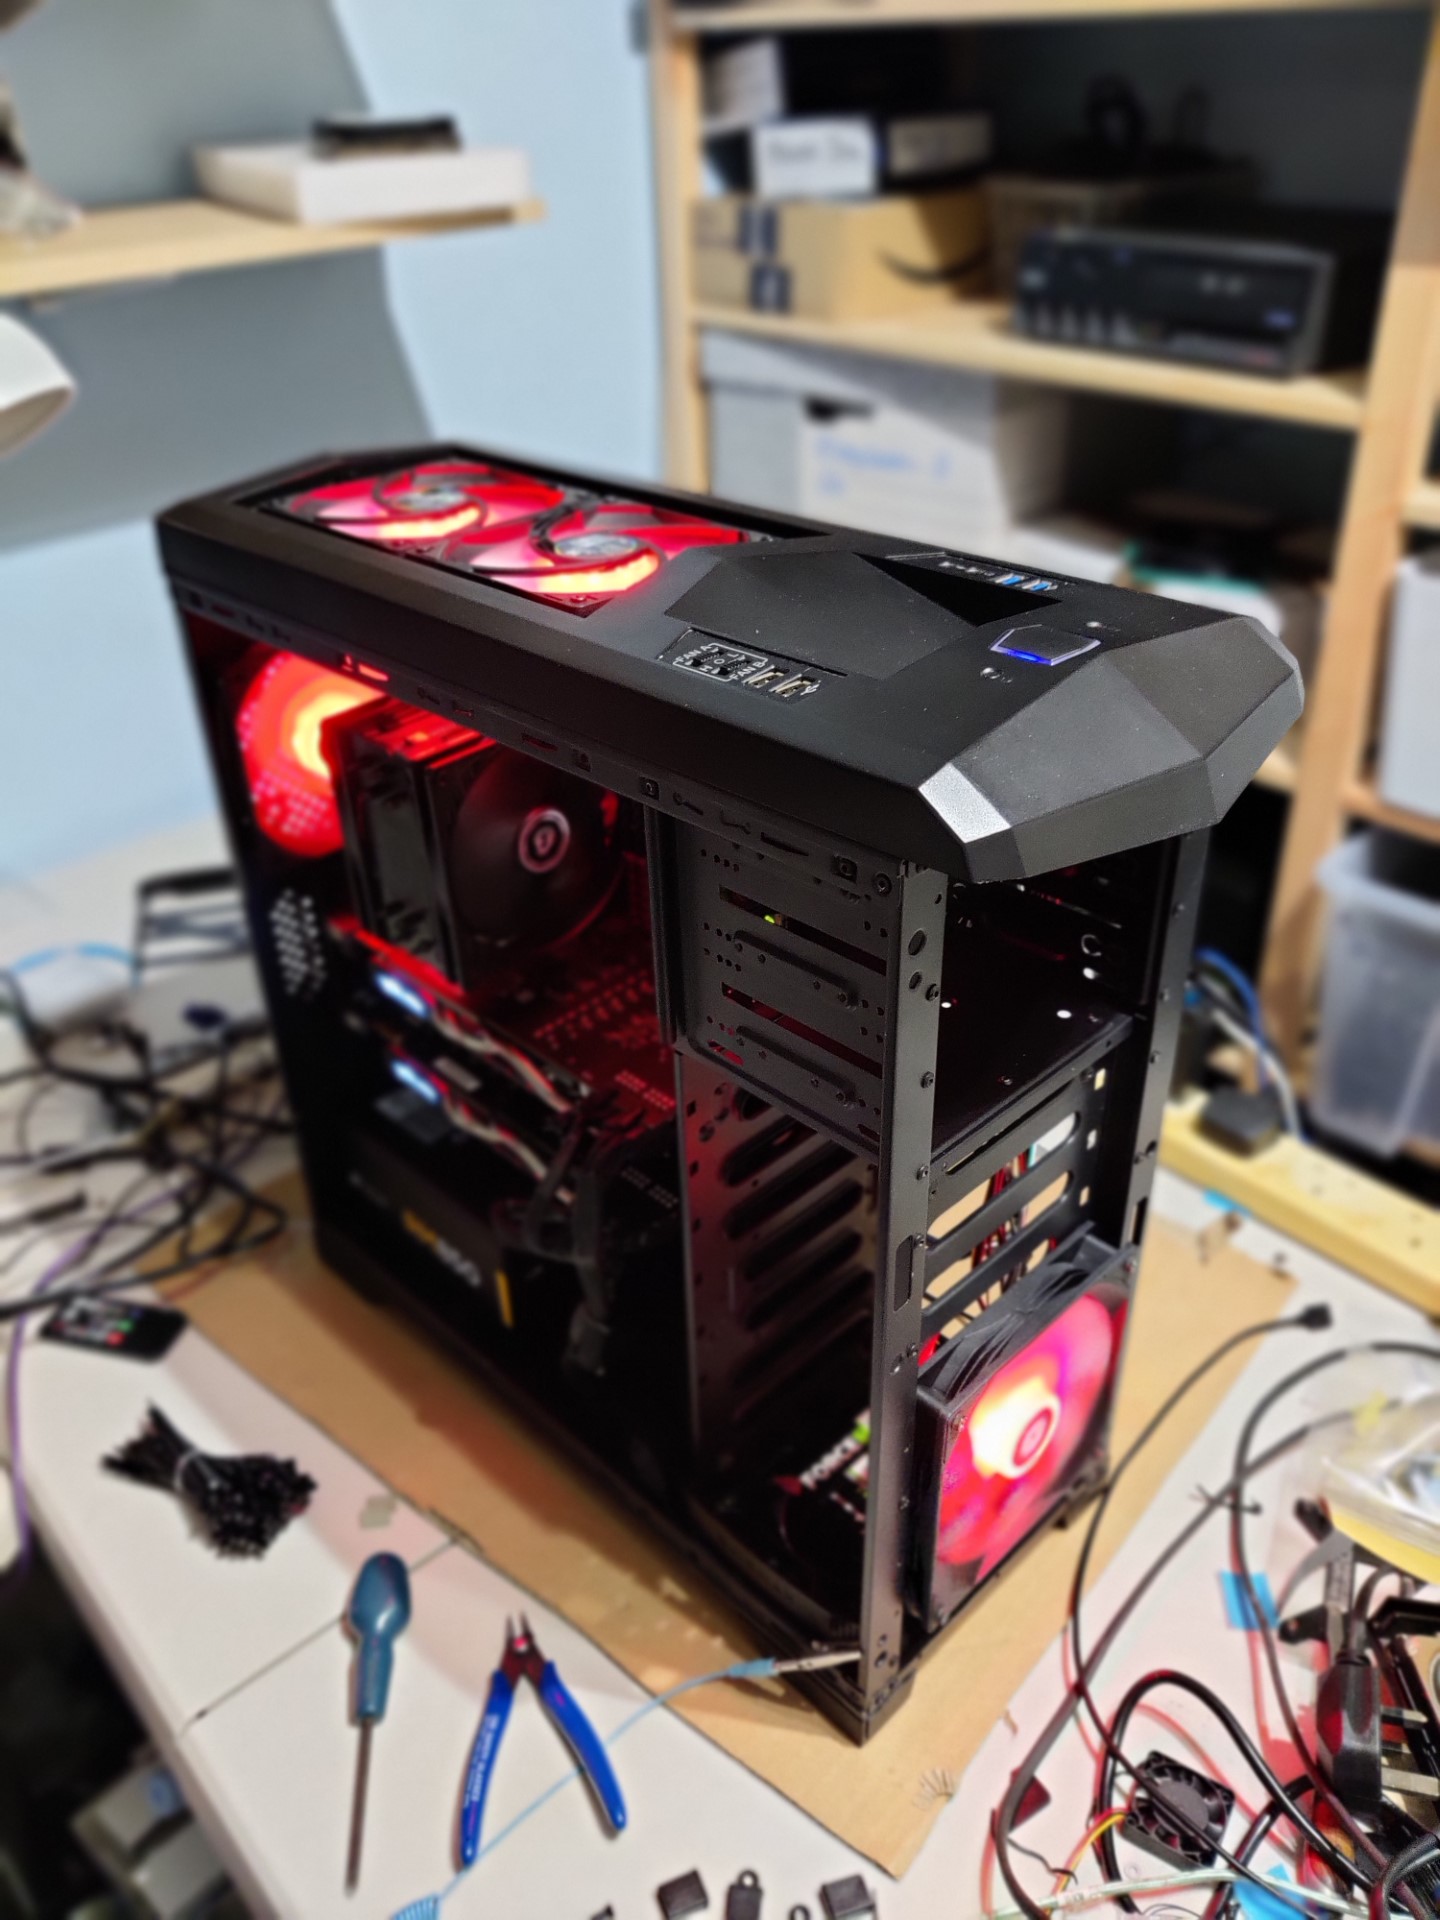
I already own a Raidmax Scorpio V (ATX-503WB) case which I bought as New Old Stock back in August 2023 when I built my dual Xeon workstation, which is a case that was launched in 2014 and has a visual style not dissimilar to the Cooler Master CM Storm Enforcer that the Z77 system uses. It’s a budget-oriented case but its big advantage is that I have owned it from new so it is in mint condition. Its disadvantage is it looks so much like the Z77 system.
Another option is the Corsair Carbide Series Spec-01, which I own due to buying a secondhand system and then stripping it for parts for resale leaving just the case. However, it’s a little beat up and its windowed side panel is very heavily scuffed and needs its acrylic replaced and also a blowover on the paint. It’s also quite a boring case aesthetically.
MSI did launch a case in 2014 but it was mini-ITX so that’s no good. That was their only case of 2014 and this is a 2014 PC.
Obviously I don’t want another Phanteks Enthoo Pro as I want all my PCs to look different.
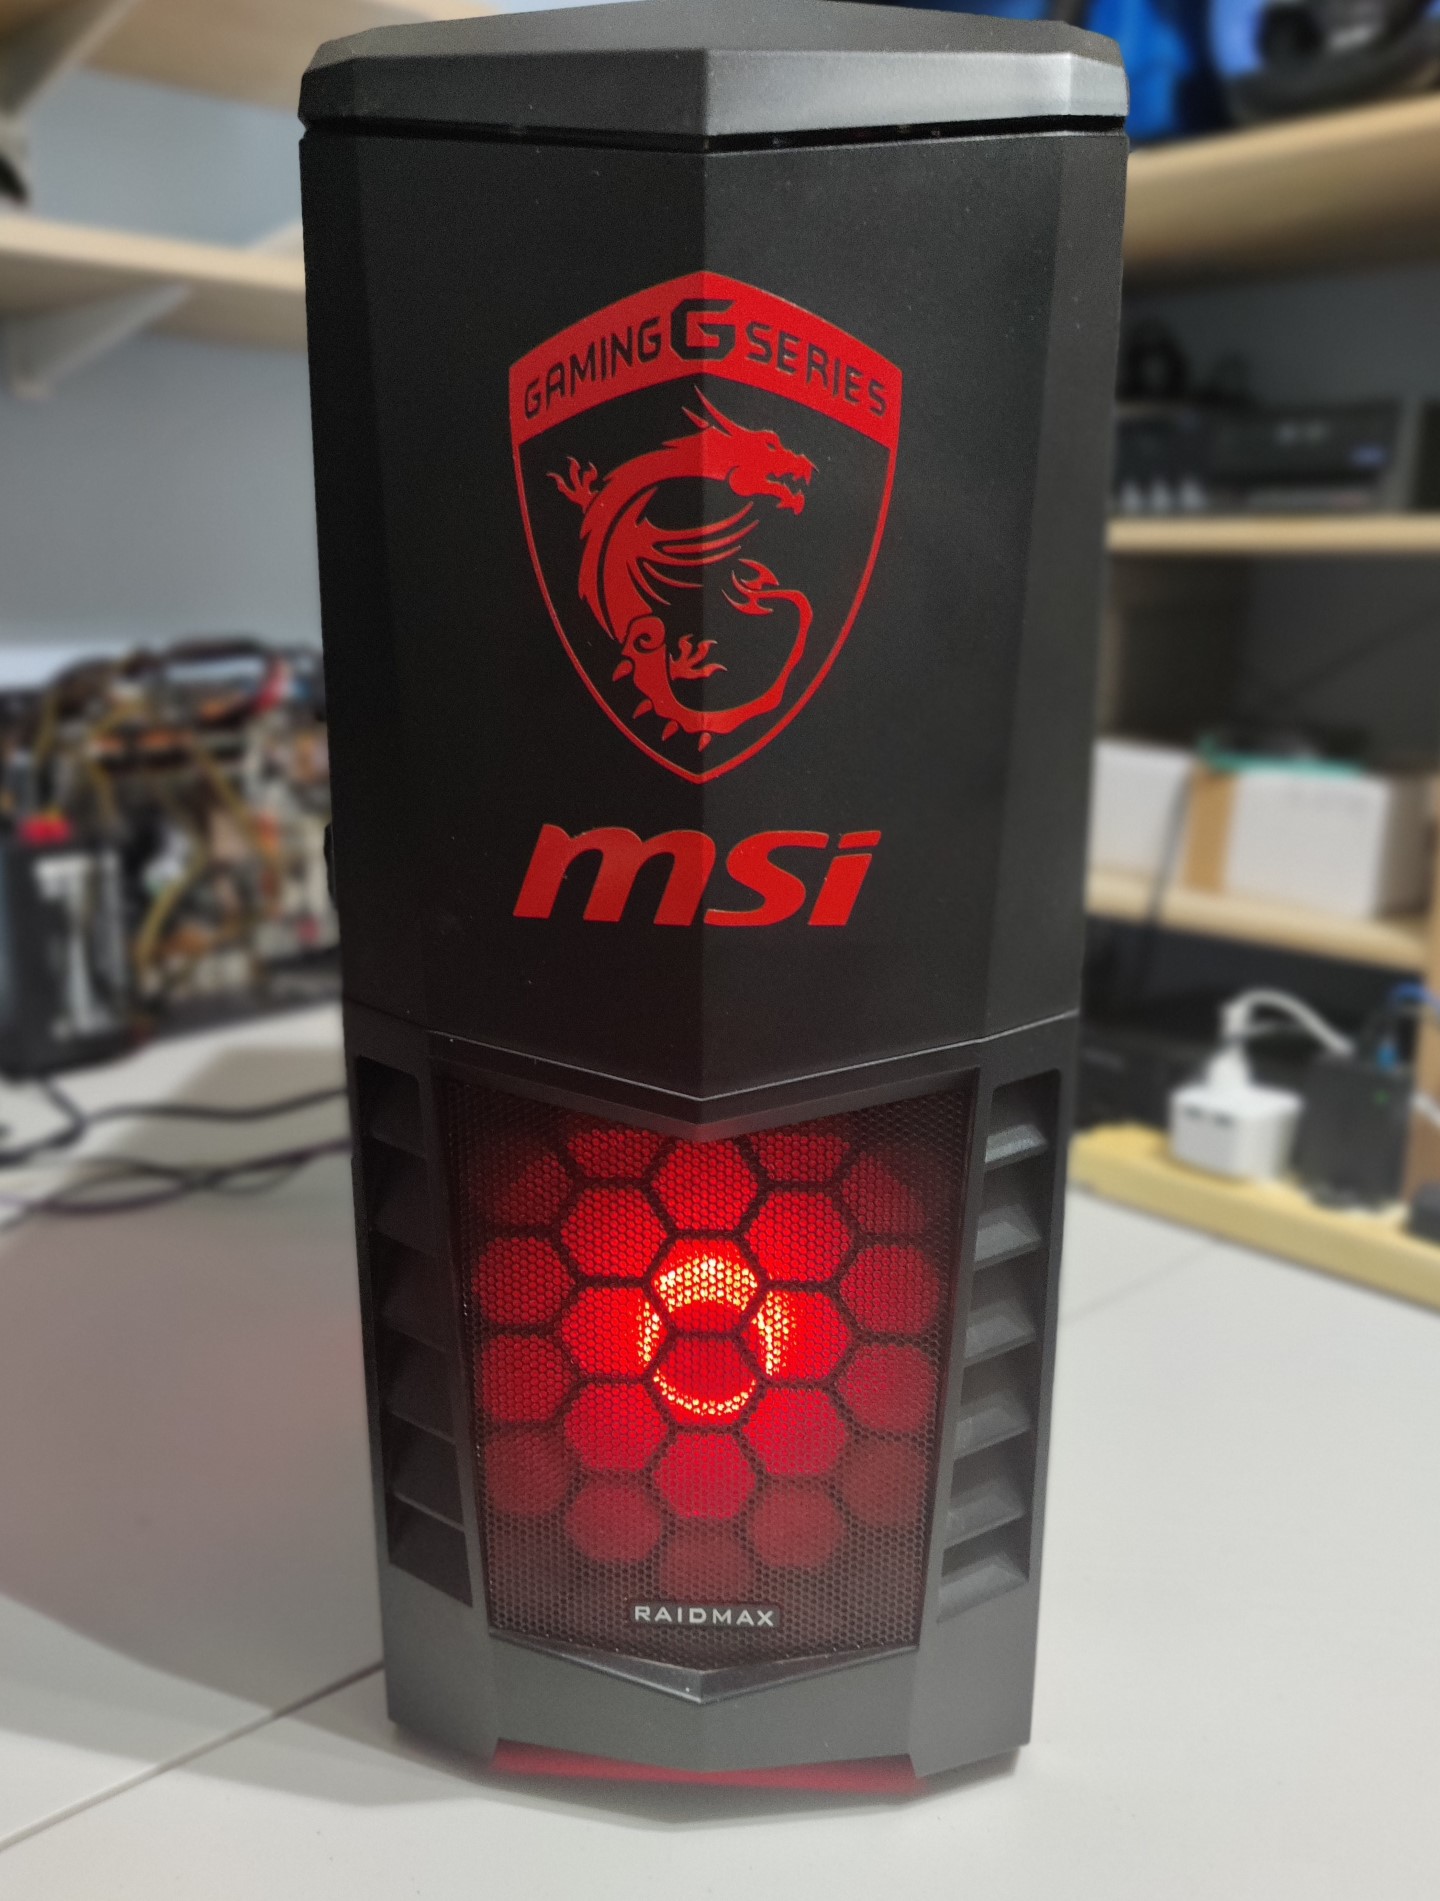
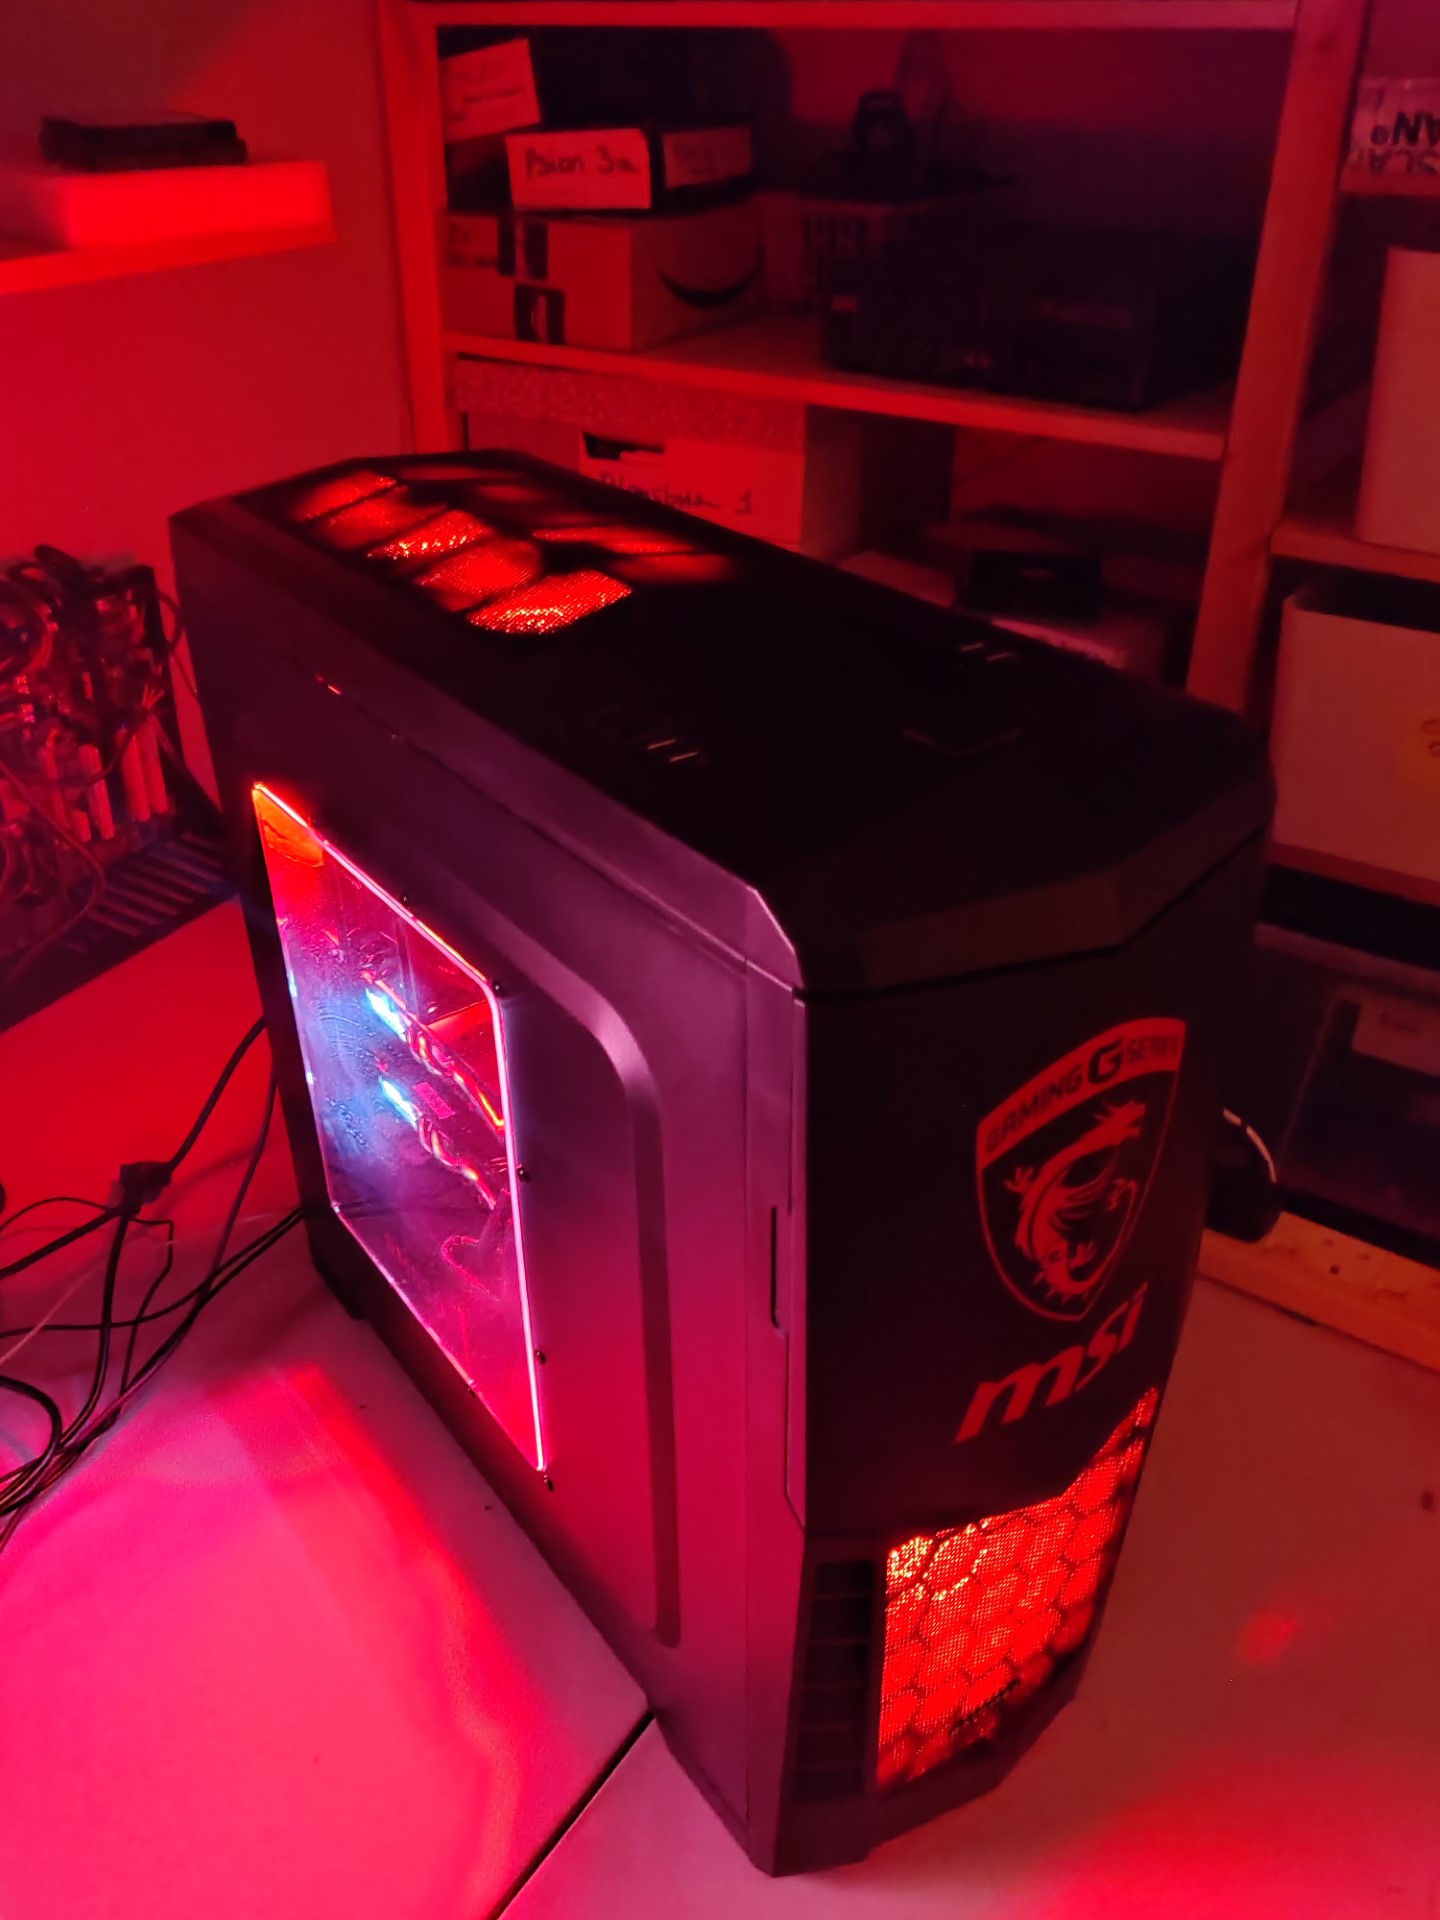
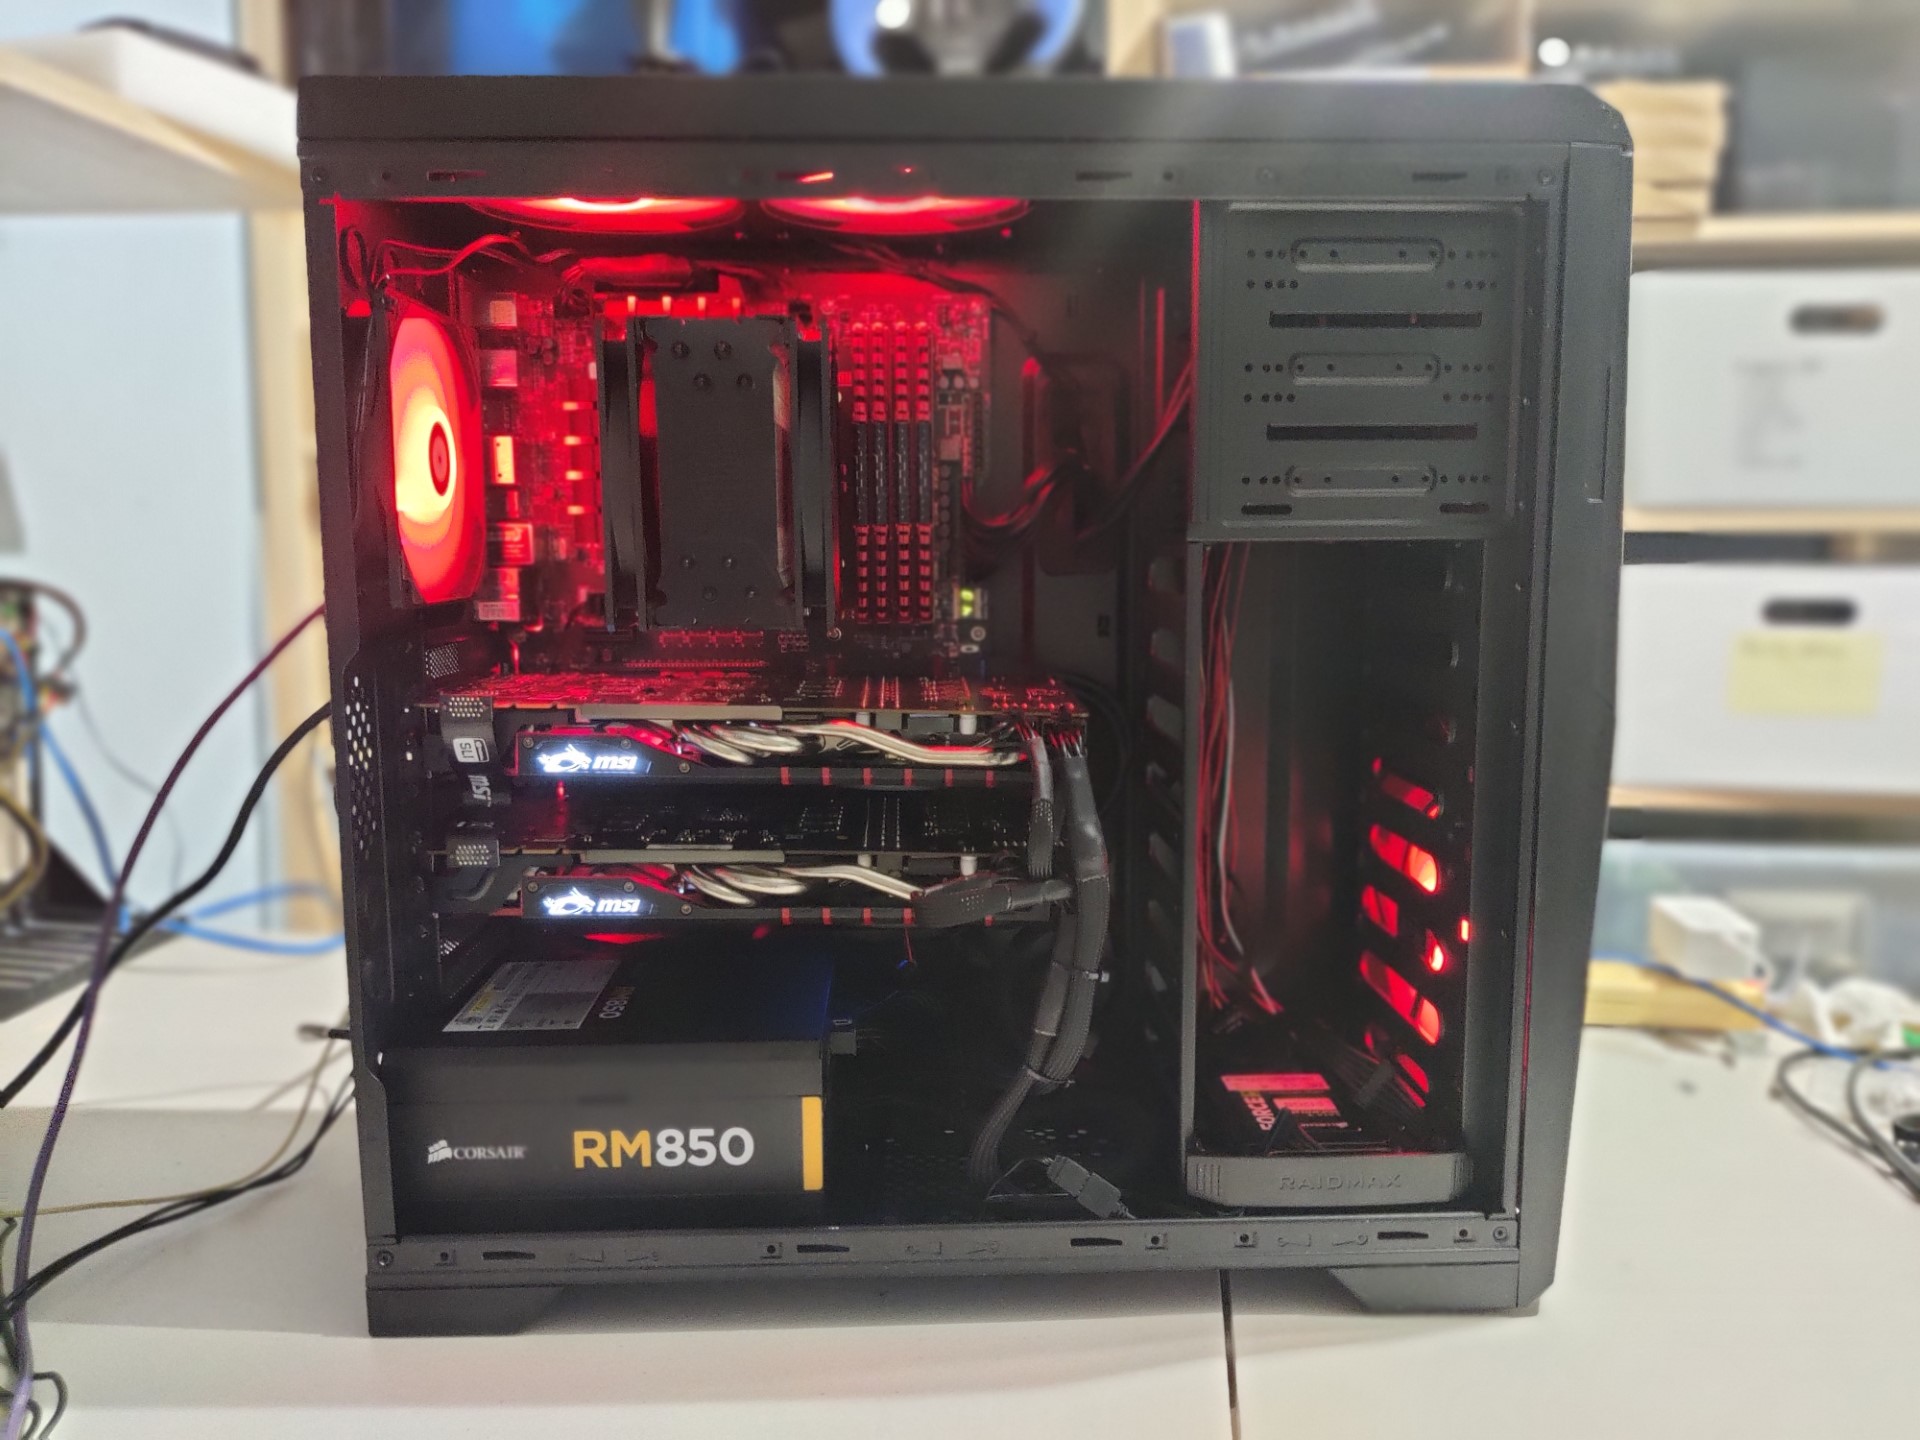
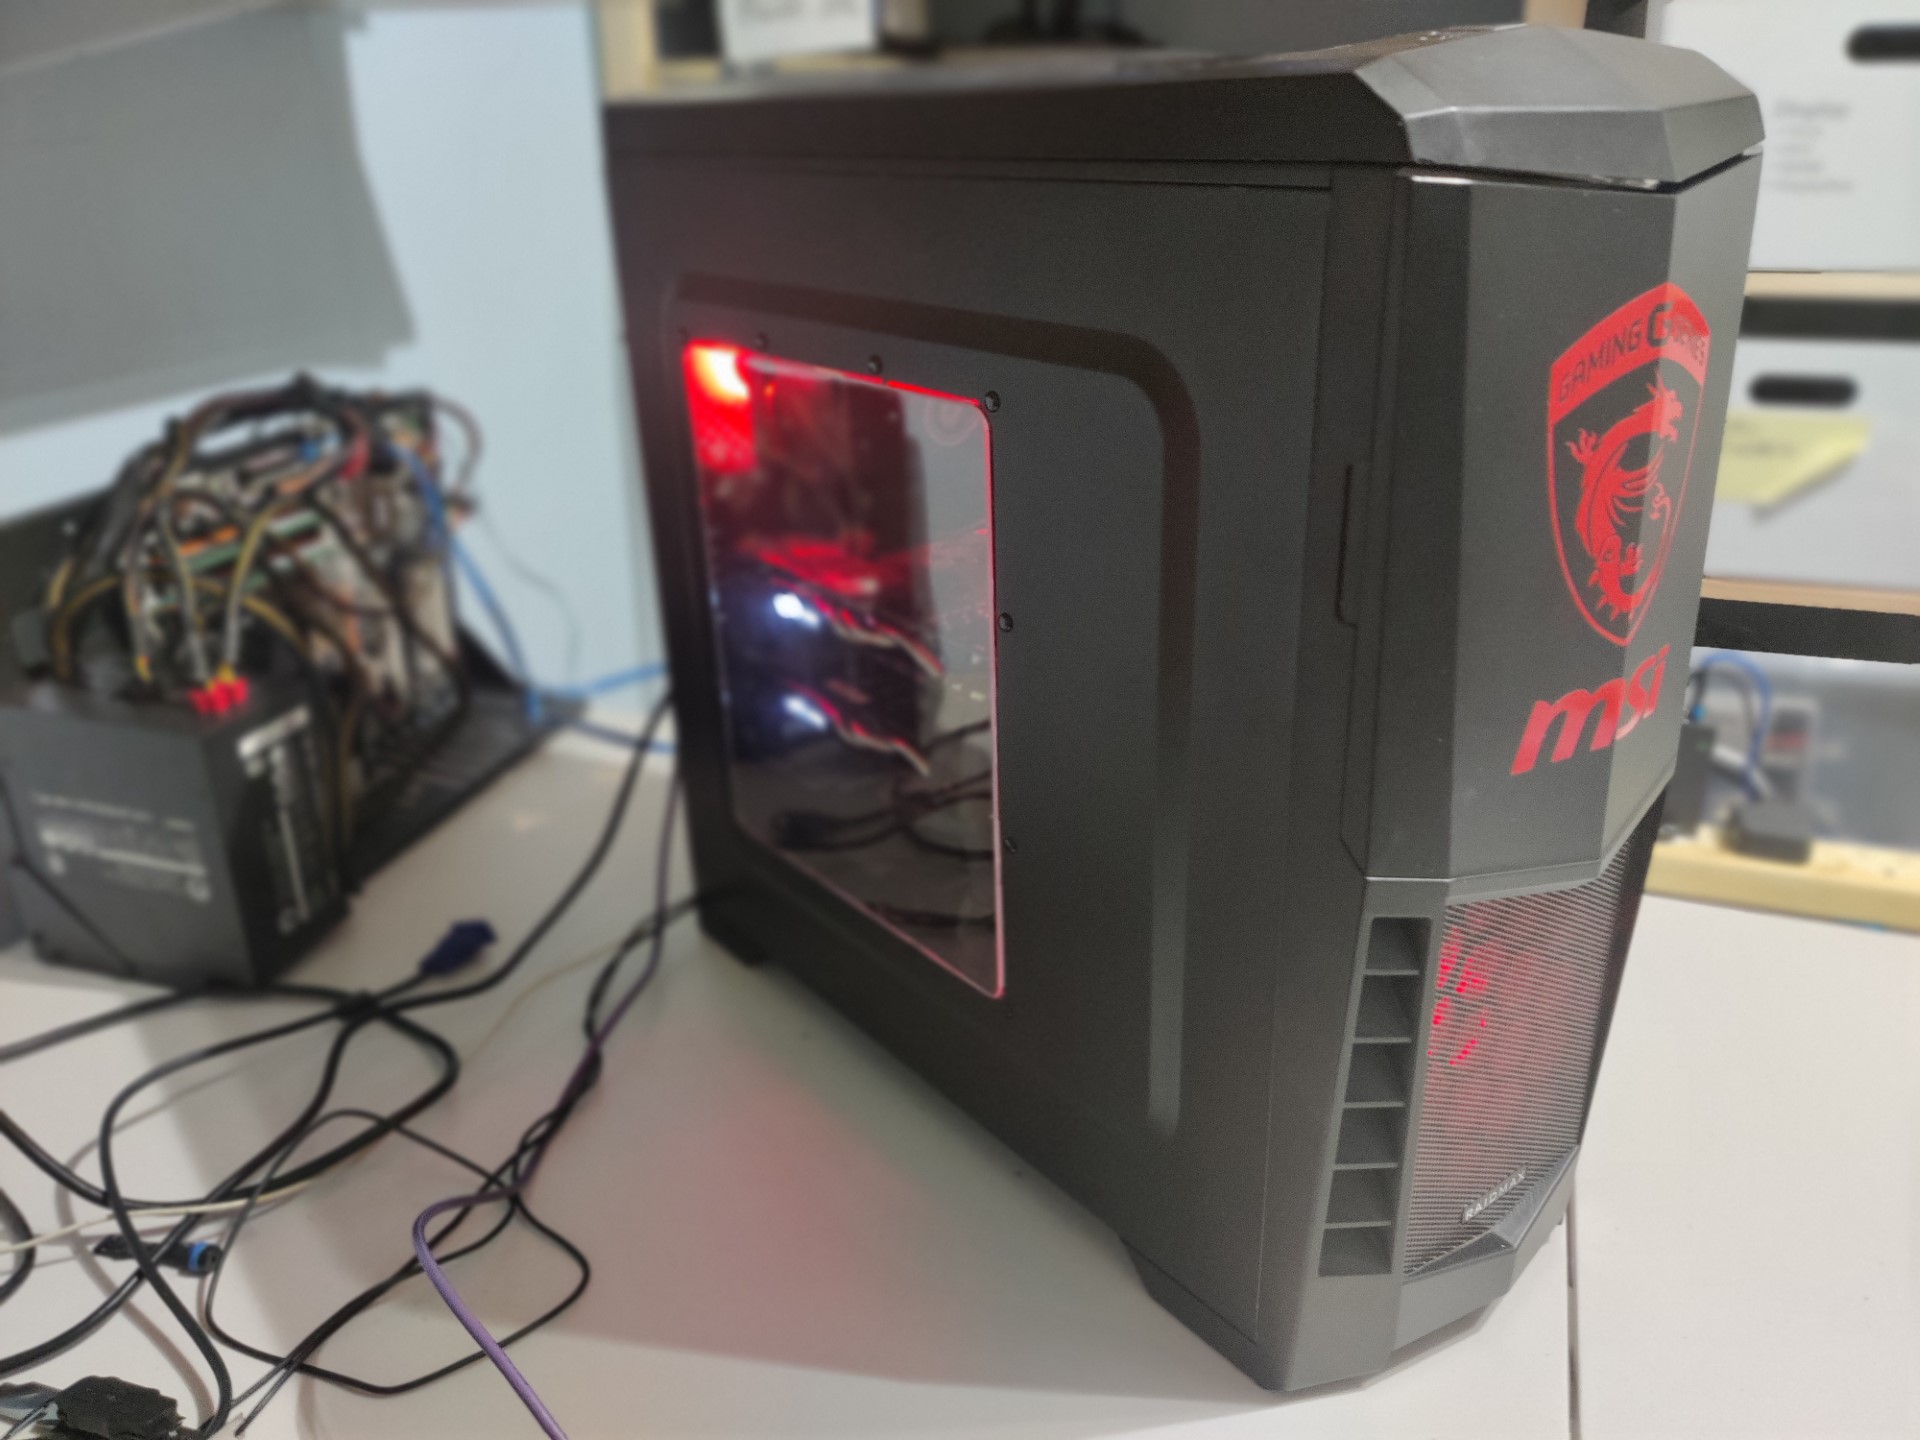
So, on reflection, and faced with not a lot of choice, it was the Raidmax case that I would be using despite its similarity to the Cooler Master CF Storm Enforcer that the Z77 build uses. But that’s not insurmountable and I thought a nice big MSI dragon logo on the front might make the difference. (Spoiler alert: It looks totally amazing!)
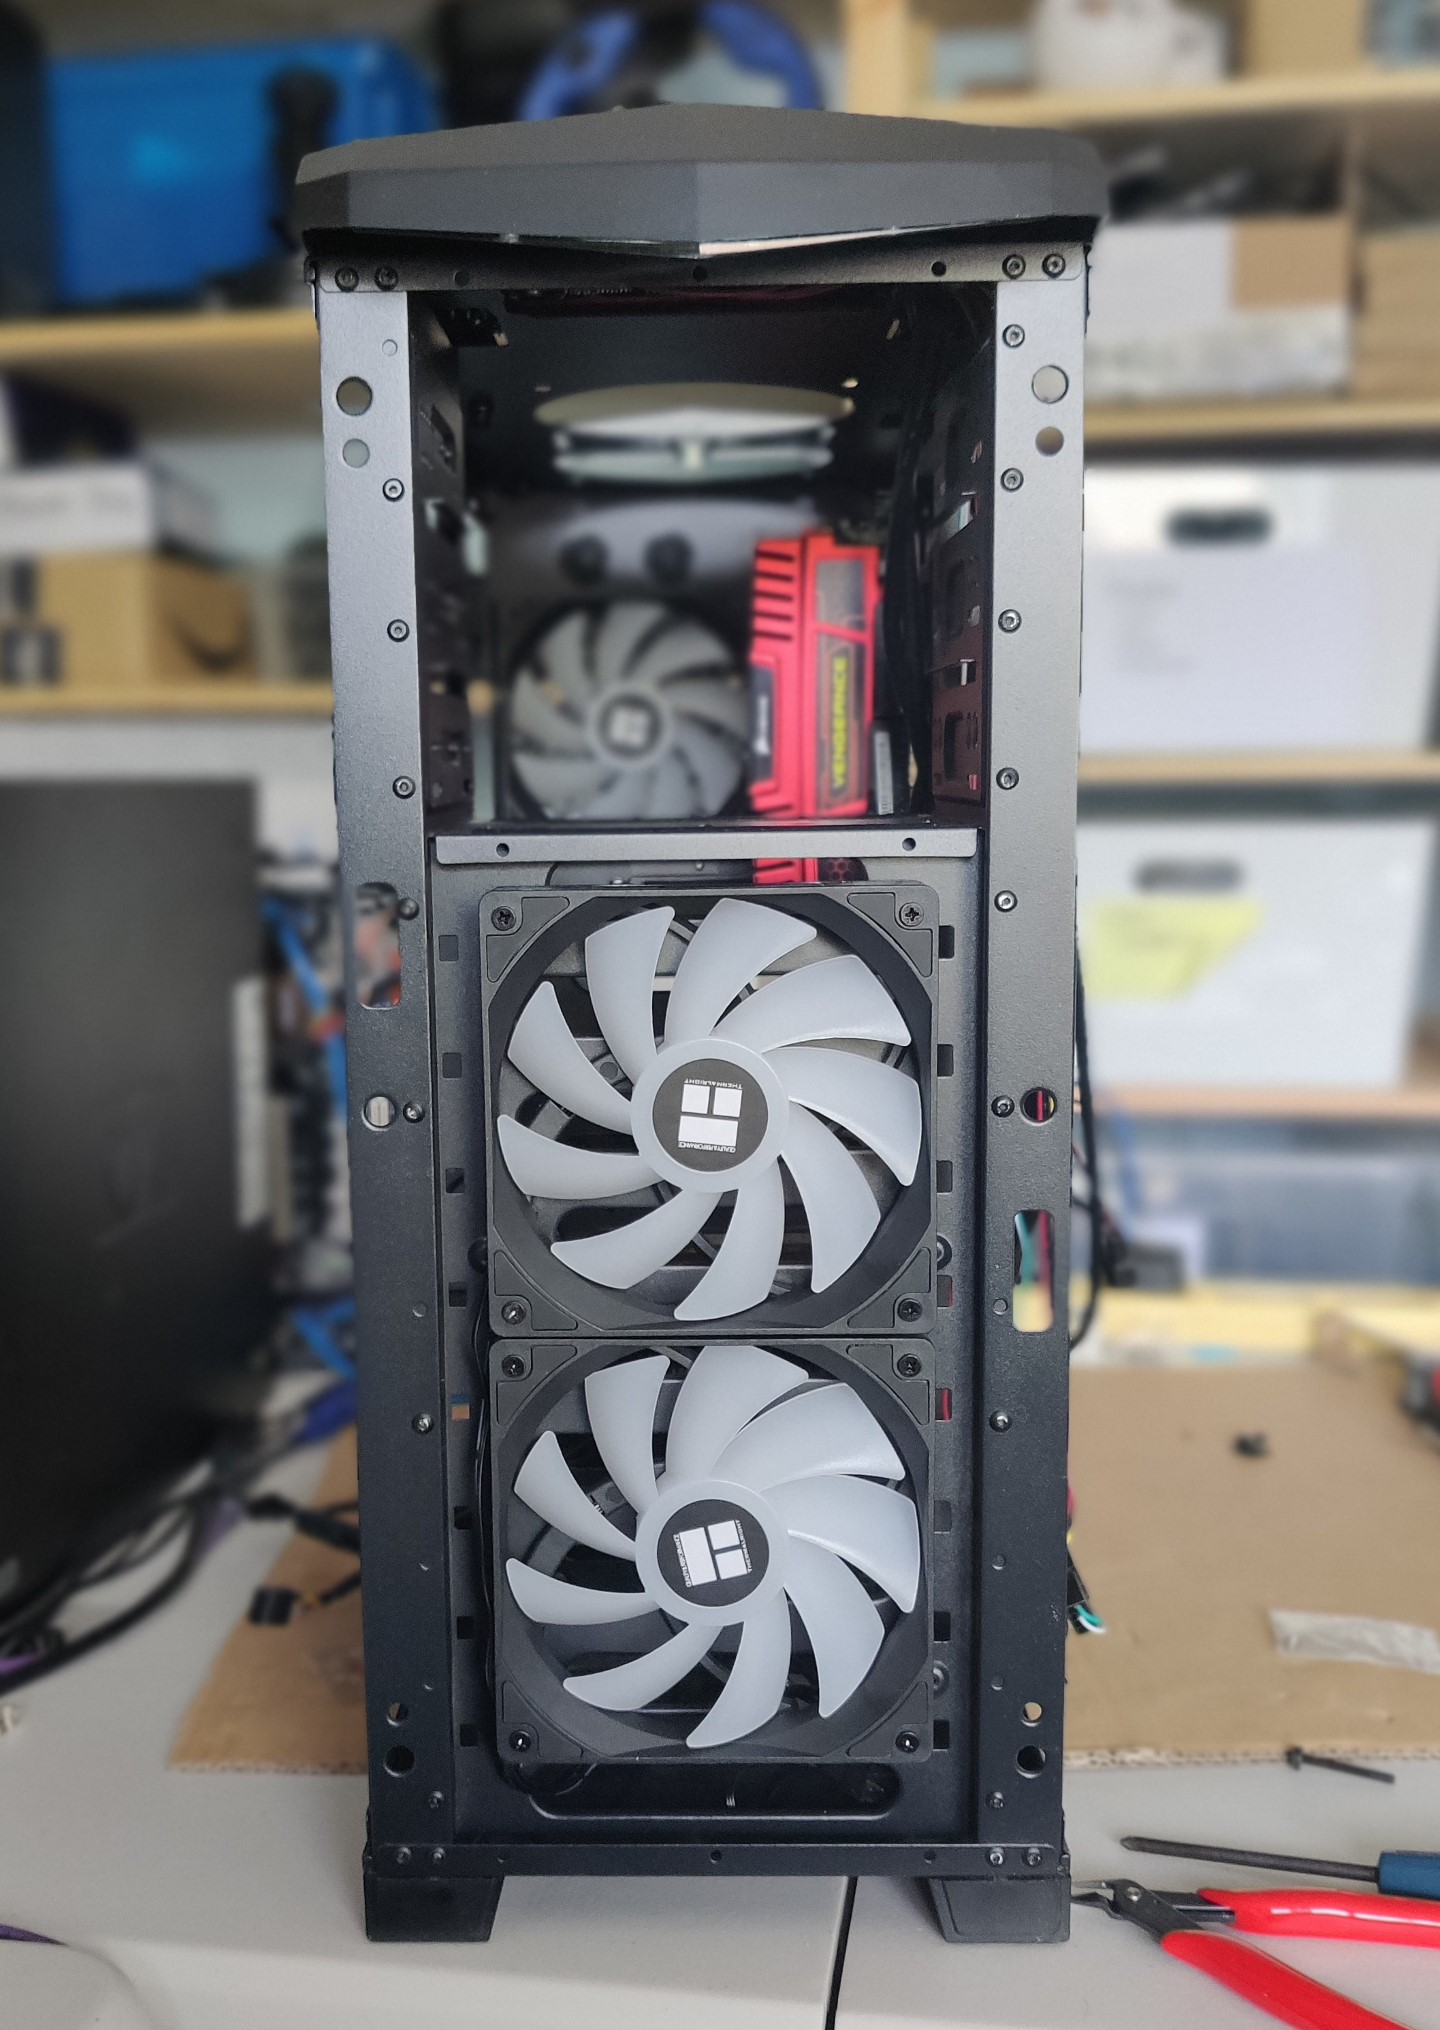
Obviously the fixed colour blue fan would have to go, as MSI is all about black and red. The front of the case takes a single 140mm fan or two 120mm fans, and the rear a single 120mm fan, so a 3-pack of Thermalright TL-C12C-S 120mm ARGB PWM fans for a frankly astonishing £9.90 from Amazon seemed like a cost-effective solution. Granted, this is not period-correct but I’m prepared to make a concession on this as fans are consumables and it is much the same as vintage cars having to make use of modern batteries, bulbs, and the like. You have to draw the line somewhere.
The motherboard is too old to have a built-in ARGB controller so another concession I had to make was for a standalone ARGB controller.
Now, onto the CPU cooler.
I initially had to mount the fan on the Cooler Master 212 EVO cooler on the pull side as the push side would have fouled the RAM, but it just looked weird. So instead I bought two slim fans and mounted them one either side, giving an aesthetically pleasing push-pull configuration. 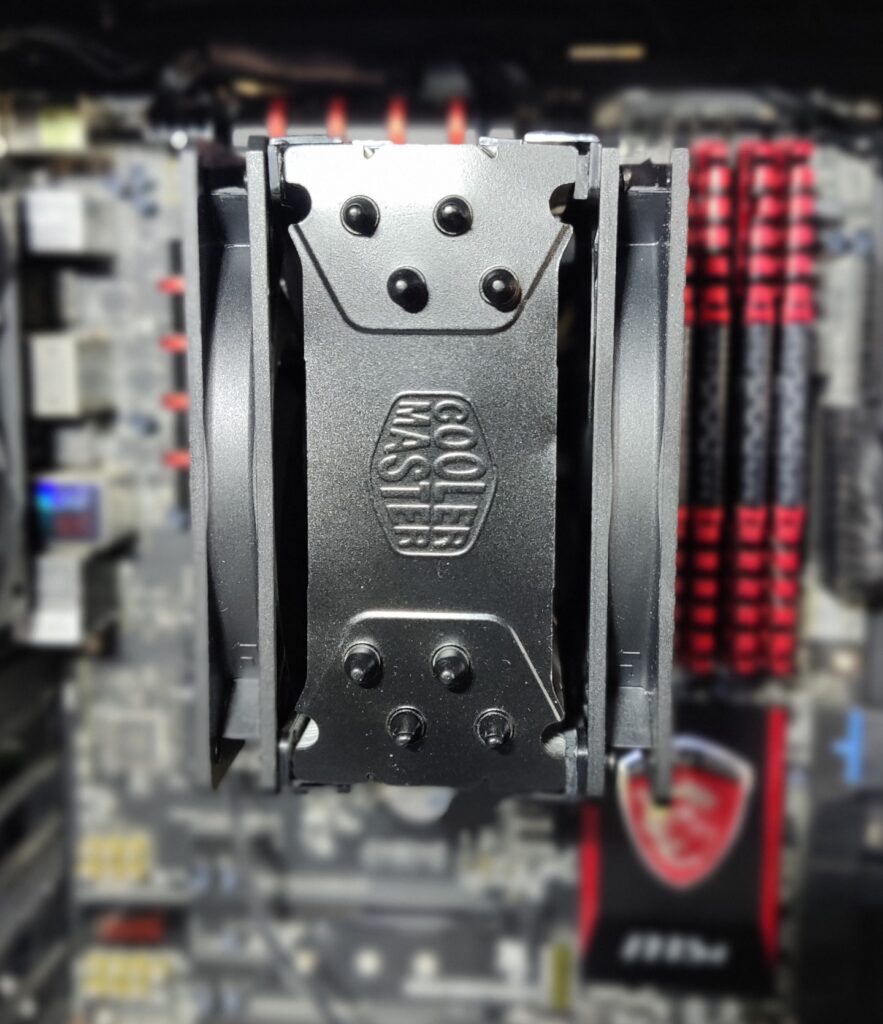 The fans are actually by Arctic rather than Cooler Master but we can quietly gloss over that.
I’ve since found that Cooler Master do make slim 120mm fans so those would have been better but, frankly, I think it would be overly picky to go to the effort and expense of sourcing them now that I have the Arctic fans. Particularly as the Cooler Master Mobius 120mm Slim is twice the price of the Arctic, but looks incredibly generic and doesn’t even have the Cooler Master logo on the fan hub, whilst the Cooler Master XtraFlo 120 Slim, with its smoked clear blades like the original fan that came with the cooler, and holographic Cooler Master logo on the fan hub, appears to be out of production. I certainly can’t find anywhere to buy them. So I think I will stay with the Arctic fans for now.
Everything went together fairly painlessly and soon the PC was up and running, albeit on integrated graphics as the two GTX 980 cards hadn’t yet arrived.
For the choice of Operating System, the versions of Windows that were available in 2014 were Windows 7, Windows 8, and Windows 8.1, with Windows 8.1 having been released in late 2013. I already have several Windows 7 PCs, so I thought I would give Windows 8.1 a go for this PC since I have never used it before, because I jumped straight from Windows 7 to Windows 10 back in the day.
Once I had tamed the awful Metro interface using Classic Shell / Open Shell, it was actually surprisingly usable. In fact I quite like it, and it is more vibrant and fun than the rather dour Windows 10. I particularly liked how, once I had set the desktop background picture to an MSI-branded one it set the taskbar and window title bars to red to match. Apparently you can actually enable that in Windows 10 (but it is disabled by default) and I never knew that!
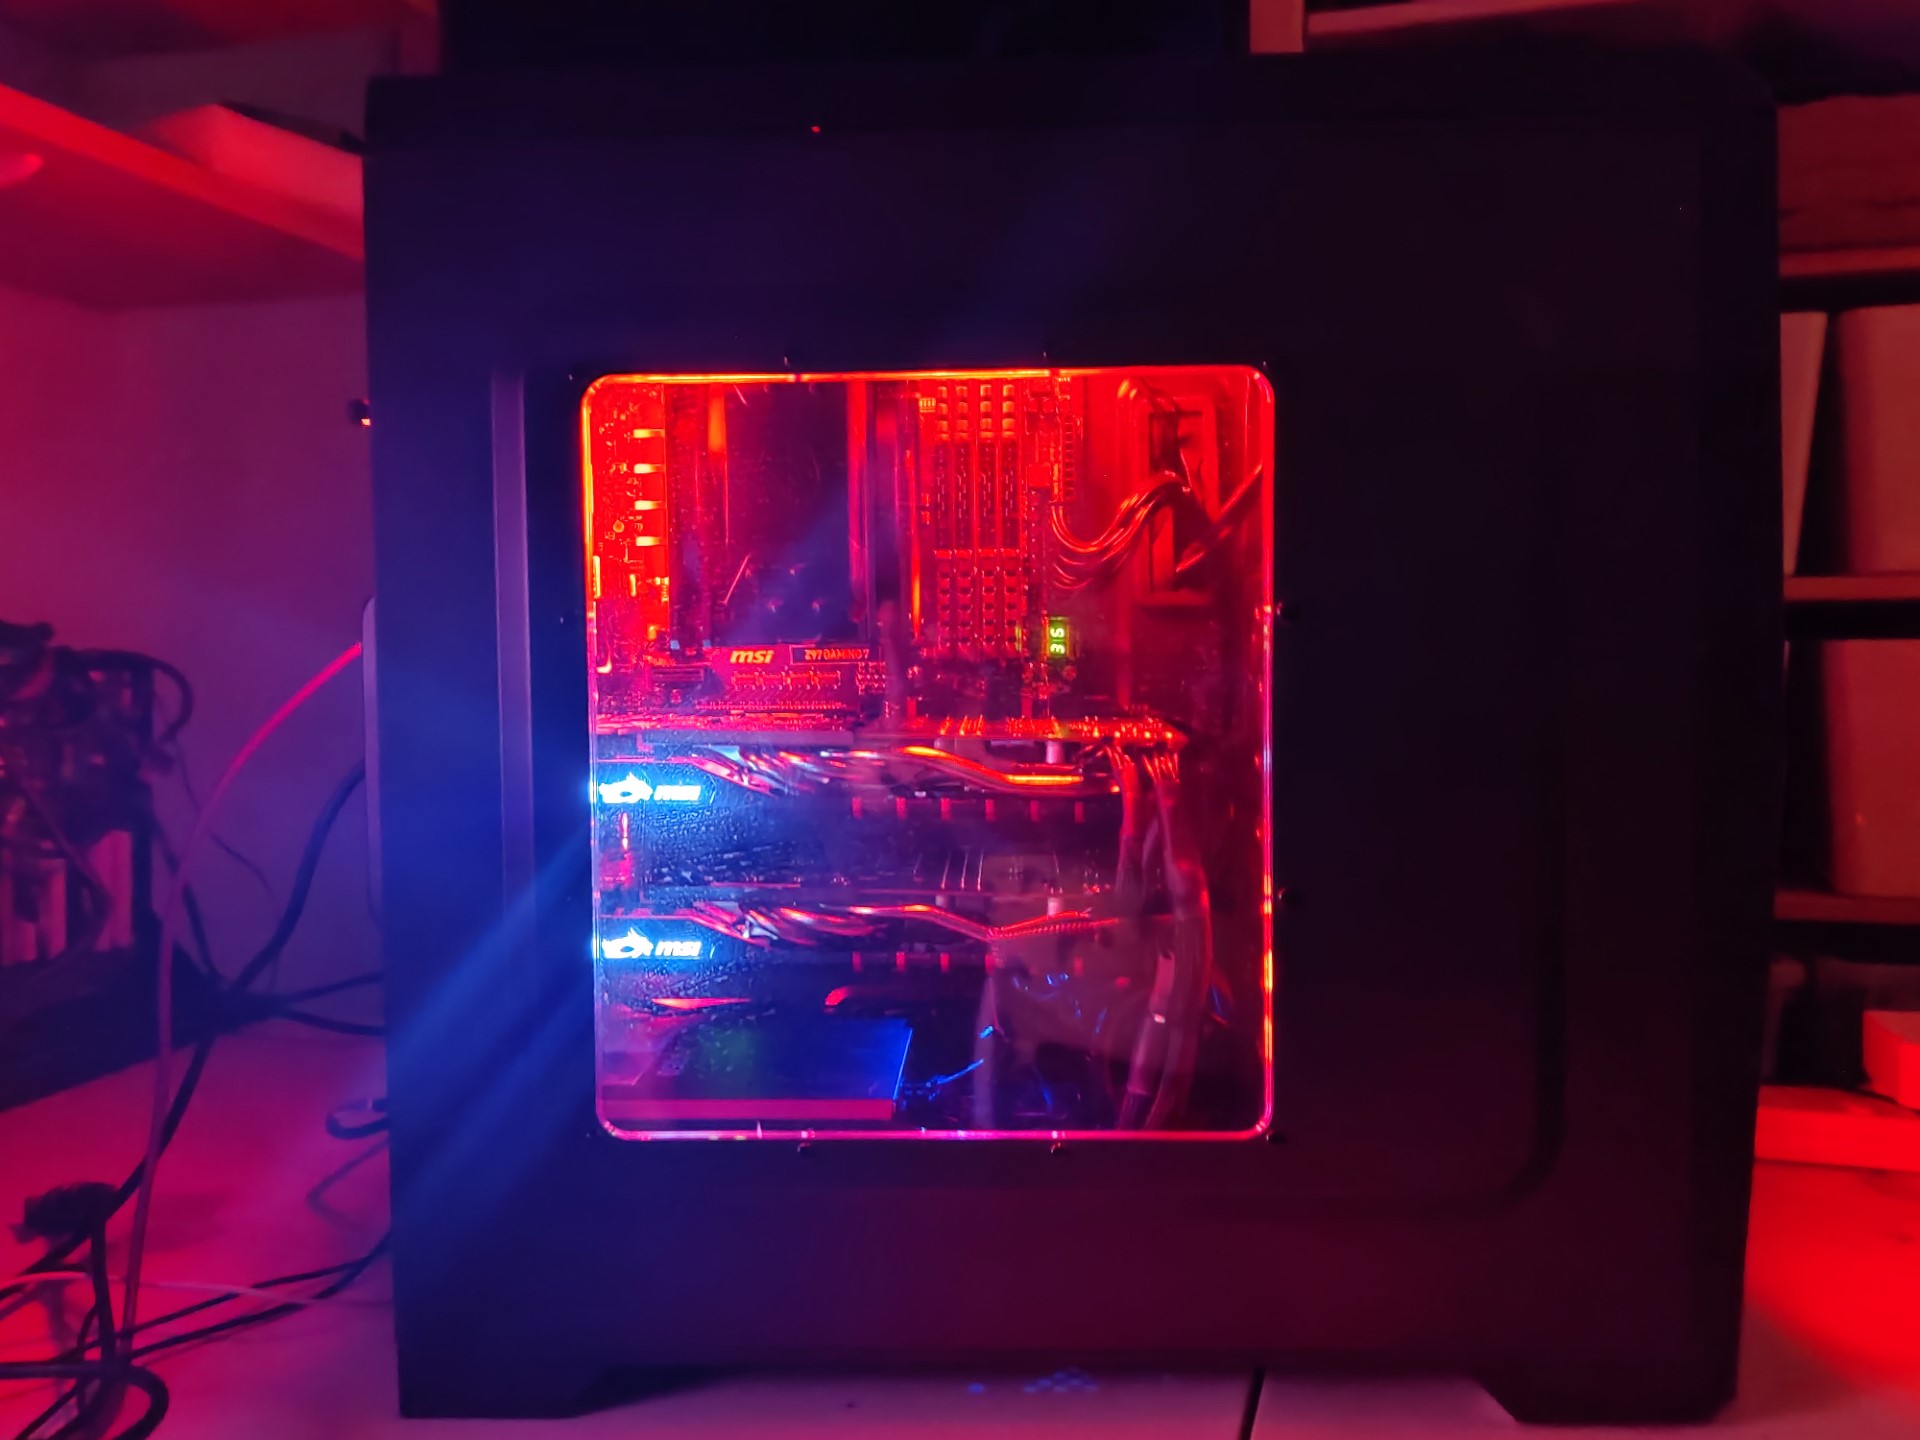
The two GTX 980 cards arrived, so they went into the case. Well, actually, what really happened is that one arrived and was fine (albeit with a bent bracket, which I fixed myself and for which the seller gave me a partial refund of £5). Then the second one arrived and it was DoA, but I got a full refund on it and was allowed to keep it. Then I sourced another, and when it arrived the MSI logo didn’t illuminate so I swapped the entire heatsink, shroud, and fan assembly with the dead card which had a working illuminated logo. I re-pasted with Arctic MX-7. The other (working) card was running very hot so I re-pasted it too and saw a big drop in temperatures.
With the build nearing completion I fitted the front grille.
I immediately realised that I didn’t like the aesthetic of the two 120mm fans in the front, when viewed through the front grille, so replaced them with an equivalent Thermalright 140mm fan and moved the two 120mm fans up top since the case accepts two 120mm fans there, under a pop-off grille.
I realise that the purchase of all these fans rather flies in the face of “why spend money unnecessarily?” from earlier in the post but never mind.
I ordered a vinyl of the MSI logo from a seller on eBay and it has turned out amazingly well, and I’m so pleased with it. The detail is amazing! Absolutely everything that is not red is cut out and reveals the case underneath (ie. the sticker is red or cut out, not red and black)
It was now time to put the side panels on, and once I got the windowed panel on I was immediately disappointed by how small the window is and how little you can see. The window needs to be much much bigger vertically. This is doable – I have done such a case mod before, and it involves cutting out a much bigger aperture with a fine jigsaw, lining it with U-shaped gasket, and then bonding in a new acrylic panel. You would have to make the cut bigger than the raised area though, which would make the window too big horizontally such that you would be able to see the drive bays. This would be unavoidable.
I think, perhaps, this is a job for another day though. Or maybe I just live with it. It’s certainly the biggest disappointment on what has otherwise been an immensely satisfying build.
Update 1
I managed to find the period correct rigid SLI bridge with LED lighting for £13.06, new-old stock in original box. GET IN!!!!!!!
Technically, this breaks period-correctness as this item was announced by MSI on 9th April 2015, but we are going to let that slip. Ok?
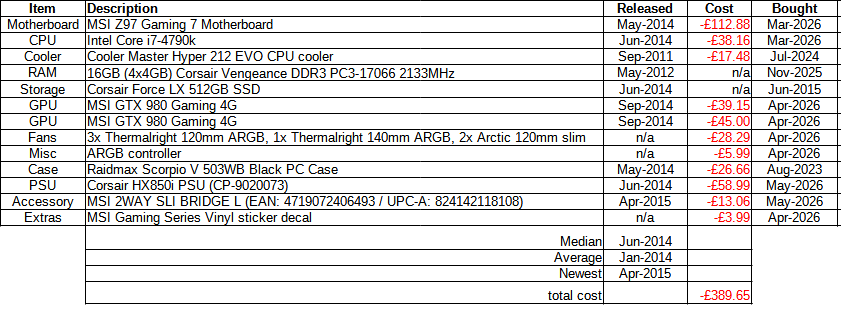
Costs
These are the build costs. As ever, things that I have owned for a long time and have been amortised are not costed.
After each update this table is updated accordingly.
Pingback: 2012 Z77 Retro Computing PC build - Data Hamster