I’ve been running a small NAS server for several years using the excellent HP MicroServer N40L upgraded to 8GB RAM (officially its max, although I know some people have got it to work with 16GB), and with five WD Red 2TB drives, running FreeNAS v9.

N40L MicroServer
The N40L only has 4 warm swap bays, or “Non-Hot Plug” as HP calls them, but also has a 5¼” optical bay into which I had put a 3½” bay adaptor tray to run a 5th drive. I had it configured as a 5x2TB RAID-Z array giving 8TB of filestore.
However, with FreeNAS now needing a minimum of 8GB RAM, and the 5th bay dragging the speed of the SATA ports down to 1.5 GB/s, I felt I had outgrown it.
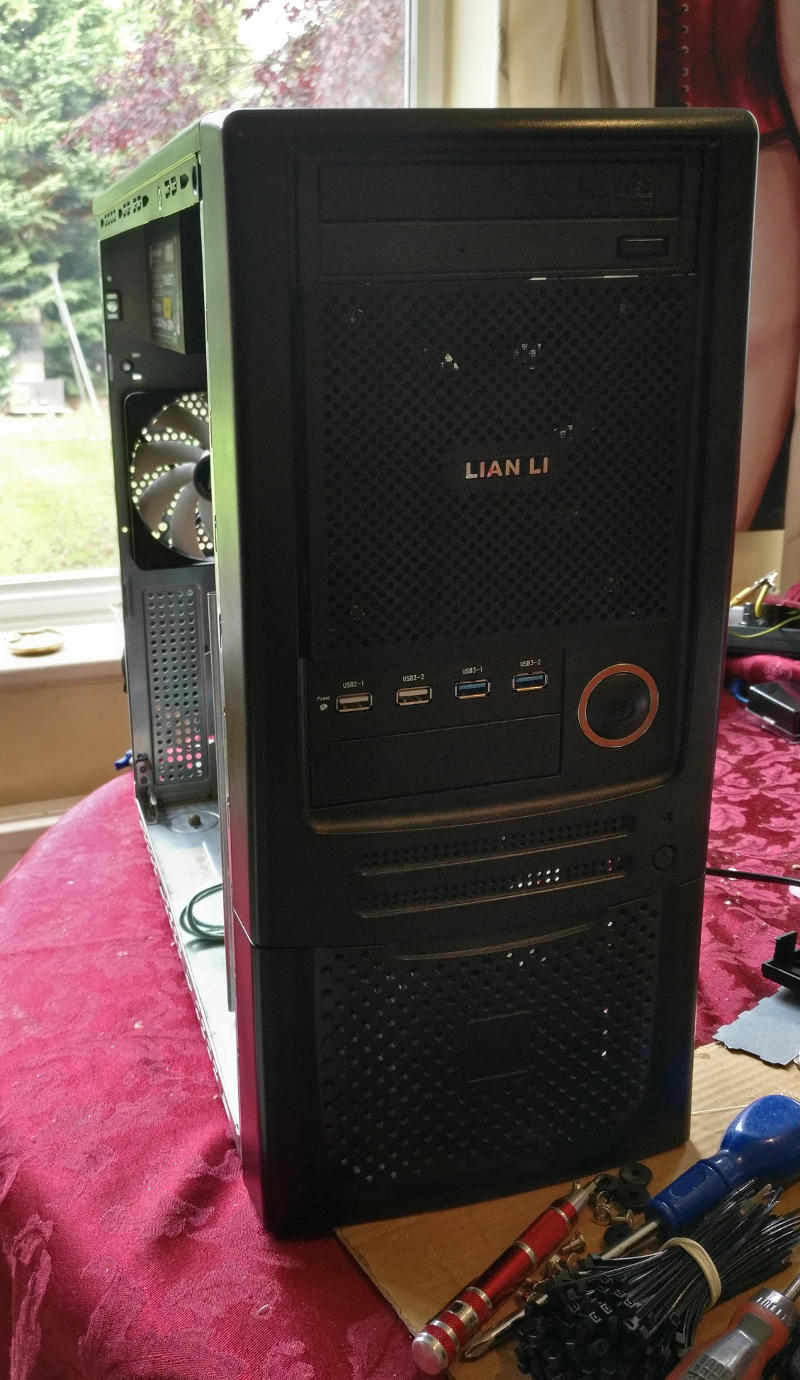
I have a very old tower case spare which has four internal 3½” HDD bays, two 3½” front panel bays, and four 5¼” front panel bays, so this seemed like a good starting point.

Case with old LGA775 board
Obviously I needed a server motherboard that would take ECC RAM, so desktop boards were out of the question which was a shame as I had an Intel Core2 Quad Q6600 CPU and corresponding LGA775 motherboard which would otherwise have been fine. Instead I put them up for sale on eBay. I put together a bundle of an old Core2 Duo E6320, the motherboard, and 4GB RAM, which fetched a measly £12.50. The Q6600 only fetched £5. So not off to a great start on the budget. I did get £17.66 for an old GTX 460 that I no longer needed though. The real money would come from selling the N40L.
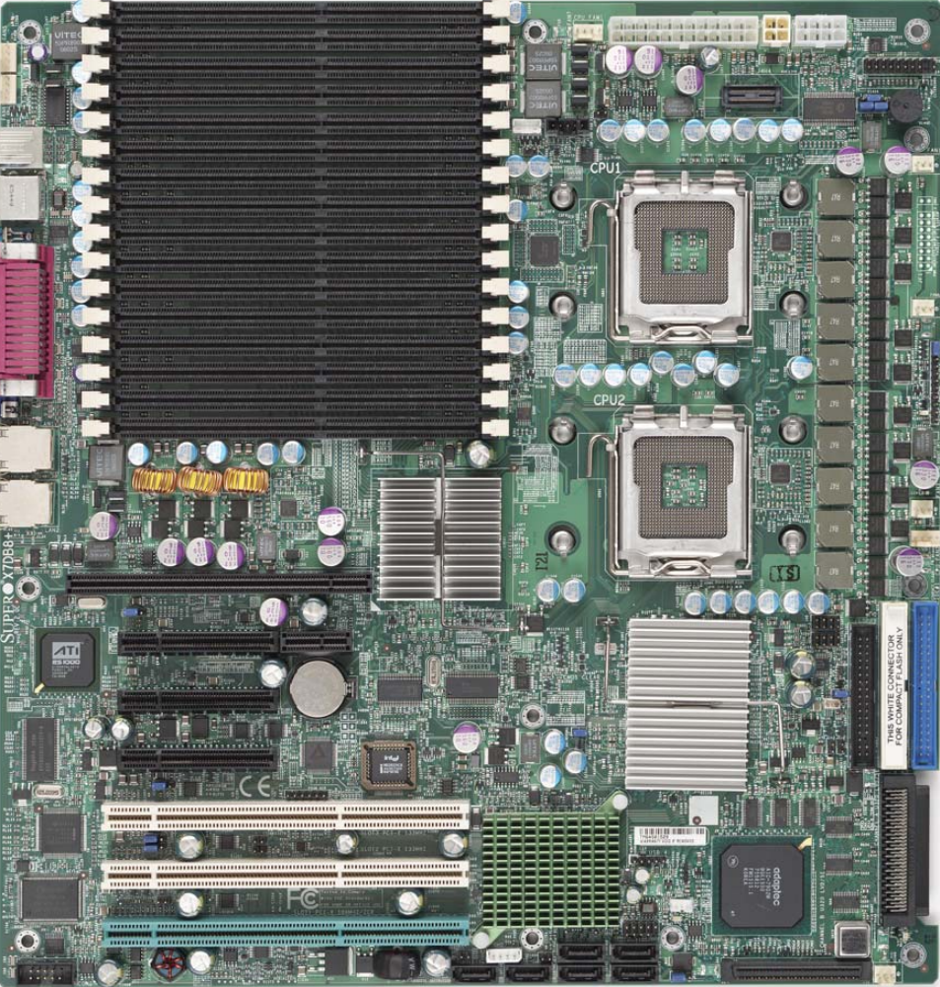
SuperMicro X7DBE+
After insufficient research, my first purchase was somewhat of a disaster. It was a SuperMicro X7DBE+ which turned out to be a proprietary “EE-ATX” size and simply didn’t fit my case. Fortunately the seller was a business who took returns, although it was a bit of a saga to finally get the refund.
EE-ATX is unusual inasmuch as unlike almost all other ATX family boards, it is taller as well as deeper. It turns out that the only cases that can take this board are proprietary SuperMicro ones.
I then did a lot more research. A LOT more. I learned all about the different motherboard sizes, what my case would take, what motherboards were available and suitable, and where the best value for money lay, because I was on a budget but didn’t want to buy too old either.
Finally, based on suitability and availability, I decided that any of the motherboards in SuperMicro’s X8DTL or X8DAL range would be suitable as they are long ATX / short E-ATX (305mm x 254mm), all take Xeon 5500/5600 series CPUs, and all take up to 96GB of Registered ECC DDR3 memory in 6 slots. All of those components are reasonably priced on the used market but still modern enough to be worth using.
The X8DAL motherboards have audio but no graphics, whilst the X8DTL boards have no audio but do have graphics, so that seemed like the better choice for a server. The top choice would have been the X8DTL-6F as this has a SAS 2.0 6GB/s controller on board, but I realised that spinning HDDs simply don’t come anywhere near even 3GB/s so money could be saved by going for something with only 3GB/s (SAS or SATA). The only SATA devices that really use 6GB/s are SSDs and I wasn’t planning on using one. Should I need one at a later data I can always add a SATA-III PCIe adapter card.

SuperMicro X8DTL-3F
After trawling eBay it became clear that a cost-effective way of getting what I wanted was to buy a used SuperMicro 1U server with a X8DTL-3F motherboard in it since these are in plentiful supply and hence keenly priced. The X8DTL-3F has six SATA-II 3GB/s (aka SATA300) ports on board, plus an on-board SAS 3GB/s controller (provided as eight SATA-II connectors), and also has IPMI. Buying as a server also meant being able to sell off the bits I didn’t want – I figured that at the very least the drive caddies and PSU would be worth something.
[Update: Be advised that, as I will mention later on (but I thought worth adding here so people would see it), the SAS controller on the X8DTL-3F is an LSI 1086E and has a hardware limit of 2TB per drive. If you can get an X8DTL-6F or X8DTH-6F then go for that as it has the much better LSI 2008 and has no such limitation.]
The one I ended up buying was a SuperMicro 1026T-M3F with a X8DTL-3F, a single Xeon E5645 CPU, and 12GB (3x4GB) of RAM, which seemed like a good starter system for me. The E5645 is a 6-core CPU with HyperThreading giving 12 threads of execution, which is comfortably more than the 2 core N40L. Likewise 12GB RAM was more than the minimum for FreeNAS, so I knew it would have me up and running immediately. Also, buying a board with minimal RAM meant there would be less wastage as the plan was to slowly populate it with 16GB RDIMMs up to the maximum of 96GB, which would mean any memory it came with would eventually be discarded.
[Update: If you go down a similar route, and are planning to use two 5600-series CPUs, be sure that the X8DAL/DTL motherboard is a Rev 2.01 – see this post for why]
When the server arrived, I thought I would fire it up “as is” to start with, simply to see it boot and verify it was working. It did, and it was, but my goodness it was a noisy bugger! So that got stripped down in pretty short order.

SuperMicro 1026T-M3F
The motherboard easily went into the desktop case with very little reconfiguration of standoff posts needed, but the first fly in the ointment was the PSU. The old PSU in the tower case has a single 4 pin EPS CPU power connector (in addition to the standard 24-pin ATX connector), whilst this server board needs two 8-pin EPS connectors (plus the 24-pin connector). Fortunately my spare desktop PC had a 600W semi-modular PSU in it with both an 8-pin EPS and a 4+4-pin EPS connector, plus the 24-pin, so I grabbed that and ordered a like-for-like replacement.
[Update: Turns out if you are only using one CPU then you only need one EPS CPU connector, so this is worth bearing in mind for single CPU systems]
With the motherboard mounted in the case, and the 600W PSU connected, it was time to fire it up and it worked first time – the POST succeeded and I was able to go into BIOS. Yay!
Next step was to connect a HDD and install FreeNAS v11 on it to get a working system. I chose to use a WD Black 160GB 2.5″ SATA HDD that had come out of a laptop which I had upgraded to a SSD. The reason being that a HDD that small could be easily stashed somewhere in the case without using up a drive bay. However I could have instead used a USB drive connected to the on-board internal USB port, like I did with the N40L, but chose not to.
This went without a hitch, which was a pleasant surprise.
I got a little carried away on spending whilst doing the research and accumulated four WD Red 4TB drives – one that I already had, a used one which I won on an eBay auction, and two that I just bought brand new as the prices they were going for on eBay weren’t far off the ex-VAT prices new (and I can claim the VAT back). So the next task was to fit these into the case.
I knew that the motherboard would drive up to four 4-pin PWM fans, and I also knew that I had a pair of Corsair SP120 Quiet Edition PWM fans in stock, so one of those went in the front to blow air over the lower HDD bays and into the case.
The plan had been to rsync the files on the old NAS onto the new, over the network, but instead I decided to just go ahead and mount the old drives into the new case, using the four lower bays plus one of the 3½” front panel bays. I also decided “what the hell”; I’d keep those drives rather than selling them and would have two separate RAID-Z arrays.
The four 4TB drives would therefore need to go in the upper bays, but of course these would need 5¼” to 3½” bay adaptors. There are plenty of options here, with hot swap caddies available that fit 4 or even 5 drives into 3 bays. Another option was a pair of Evercool Armour HD-AX “3-in-2″ (ie. three 3½” drives in two 5¼”) cages, which I liked because they would maximise my four front panel bays, and they had fans. However, I had concerns about the small 80mm fans causing noise. Plus they would work out quite expensive when buying two.
But they did get me thinking about fan cooling, and cages that take up three bays are the right size to use a 120mm fan, which would mean being able to use the other SP120.
In the end I decided on the Lian-Li EX-36B1. I did consider the Icy Dock Vortex MB074SP-B, but I went for the Lian-Li for three reasons – firstly it was much cheaper, secondly I think the Icy Dock looks hideous, but the killer was the Lian-Li can mount four 3½” HDDs plus two 2½” HDDs, thus letting me conveniently mount the boot drive.

Granted, the drives need to be bolted in with the Lian-Li, rather than having caddies, rails, or any other quick change mechanism, but I don’t feel it justified the extra cost, especially as the lower drives aren’t removable either. I figured I could cope with the extra downtime in the event of a drive failure.
[Update: Although, having said that, when I ended up needing to replace HDDs, I did rather curse this decision as it was a bit of a pest to swap a drive; you have to disconnect the fan and all drives, pull the whole cage out, slacken all the screws, then remove the ones that hold the HDD you need to change, swap it out, and then tighten up all the screws and then re-install and connect everything up again.]
[Update: In 2021, if you look on Amazon or eBay for “HDD cage” then there are now loads of “5 into 3” cages that use rails for mounting, and one of these might have been better, even though the build quality looks vastly inferior.]
The Lian-Li cage came with a 3-pin 120mm fan but I wasn’t fussed by this as I was going to swap it out for an SP120 anyway.
On the subject of fans, I realised that all of the 120mm fans I had in stock, apart from the two SP120s, were 3-pin so I ordered a general purpose Arctic 120mm PWM fan for the case exhaust.

Bench test
Whilst I was waiting for parts to arrive, I borrowed the detachable auxiliary cage from my Cooler Master case and used it as a convenient way to temporarily stack the four 4TB drives. It made for a bit of a frankencomputer temporarily, but worked well enough for bench testing.
I connected the four 4TB drives to the SAS controller’s SATA ports and booted, but I noticed that the controller only recognised them as 2TB drives. A quick google revealed that the on-board SAS controller on this motherboard is the ancient LSI / Broadcom SAS1068E, and this is a known hardware limitation. So I instead connected them to the SATA300 ports, and they were recognised as 4TB drives. So that was fine.
[Update: This limitation has of course now locked me into the use of 2TB drives for this array, unless I add an additional HBA.]
I connected the five 2TB drives to the SAS controller’s SATA ports since, being 2TB drives, they wouldn’t be affected by this and indeed they were not.
I set the 4TB drives up as a new RAID-Z pool in FreeNAS, and then imported the old 5x2TB RAID-Z pool from the old NAS, which mounted without a hitch. This was all going too easily!
I did a config backup of the system, and then tried importing the old config from the old FreeNAS v9 machine, to see if I could get a quick win on getting all the shares, jails, user accounts, etc. back. Hopes weren’t high and it messed things up so thoroughly that I needed to do a fresh install of FreeNas v11 again. But that was ok as it didn’t take long.
I then had to set up users, shares, jails, etc. again from scratch. This was a little annoying but not too terrible as I fortunately did not have many jails.
I think that, with hindsight, what I should have done was upgrade FreeNAS v9 on the N40L system to FreeNAS v11, backup the config, and then import it onto the new system with only the 5x2TB drives fitted, and it might have had a far better chance of just working “as is”.
By now the Lian-Li cage had arrived, so I took it apart to fit the SP120 fan.

Lian-Li EX-36B1 fan change
I was pleasantly surprised to see the Lian-Li cage came with rubber shock mounts for all drives plus all drive screws, which was a nice bonus. It’s a lovely bit of kit, and is all metal with lots of it aluminium.
Once reassembled, I fitted the drives and the whole assembly fouled the case’s drive bays. I realised that the cage was asymmetric top to bottom, and that I had mounted the drives the wrong way up. In fairness, I had mounted them the right way up, but they were designed to be mounted upside down! I decided I didn’t like this, so simply rotated the mesh front panel through 180° to allow me to mount it the other way up and everything fitted beautifully.
Case front
Since I had a spare 5¼” front panel bay, I decided to fit a DVD R/W drive in there. It can always come out at a later date, but I figured that it was lying in a drawer unused, I had enough spare power connectors and SATA connectors unused that I could spare one of each, and it may as well be there as a blanking plate.
I also had a 3½” front panel bay free, and happened to have a connector box lying around which gives two USB2 ports and two USB3 ports by attaching to headers on the motherboard, so I fitted that. Since the motherboard doesn’t have USB3 I ordered a cheap PCIe board that gives two rear connectors and a header.
I was concerned about cooling on the CPU, and sure enough after several hours of test running I got an overheat alarm on the CPU.

70mm fan mod
This was mitigated somewhat by attaching a 70mm PWM fan over the heatsink with cable ties.
This enabled the CPU to run hot but stable, however it was still running hotter than desirable so a more permanent solution was needed.
Although the motherboard uses LGA1366 and hence you would think that any cooler designed for LGA1366 would work, that’s not the case. Server motherboards use a different mounting to consumer boards. The latter often use push pins but with server boards you screw directly to an M3 threaded mounting plate.
There is an informative post on servethehome that pointed me in the right direction on this.

Rear of the motherboard, showing the heatsink mounting plates
As that post mentions, the Noctua NH-U12DX (discontinued) and NH-U12DX i4 (still available) are specifically designed for server motherboards, however they are really expensive. A much more cost-effective solution (as in less than half the price) is the CoolerMaster Hyper 212+ / EVO / 212X. These three coolers all use a bolt-through design with their own backing plate. For a Xeon server motherboard, this is discarded and, instead, you use standoffs to bridge the gap between the screws on the cooler and the threaded sockets on the heatsink mounting plates.
I decided to go for the 212 EVO as it is more readily available than the new 212X. Again, used prices on eBay weren’t far off the ex-VAT price of buying new, and I managed to save a little by finding a B-grade one on Amazon Warehouse.
In the meantime, I was keeping an eye out on eBay for memory. The motherboard specs state that it will drive DDR3 memory at 1333MHz but notes that with quad rank RDIMMs (ie. 1x16GB) this is reduced to 1066MHz so PC3-8500R is sufficient. The three specific parts on SuperMicro’s memory compatibility list are Hynix HMT42GR7BMR4C-G7, Samsung M393B2K70CM0-CF8, and Micron MT72JSZS2G72PZ-1G1D1. I searched on those part numbers on eBay and managed to pick up a Samsung item for £30 inc delivery from a VAT-registered seller, and another for £23 inc delivery from a seller who is not VAT-registered.
The first one arrived very quickly, and I swapped it out for one of the 4GB RDIMMs already in there, and upon powering up it was instantly recognised by the BIOS and by FreeNAS, giving 24GB in total. The second took far longer to arrive, but when it finally did arrive it too worked fine, giving 36GB in total. The two 4GB RDIMMs that came out can’t be used unless I fit an extra CPU, as the 2nd bank of 3 memory slots are not available with only one CPU fitted.
[Update: I subsequently managed to source a Hynix HMT42GR7BMR4C-G7 for £20, and put that in as well. It worked quite happily alongside the two Samsungs and gave a total of 48GB which is the maximum for one CPU]

36GB ECC
By now the cooler had arrived, so I decided to do a dry fit on the unpopulated CPU socket on the motherboard rather than disturbing the fitted CPU, so that I could evaluate the fitting method. If it didn’t work I could then send it back in an unused condition.
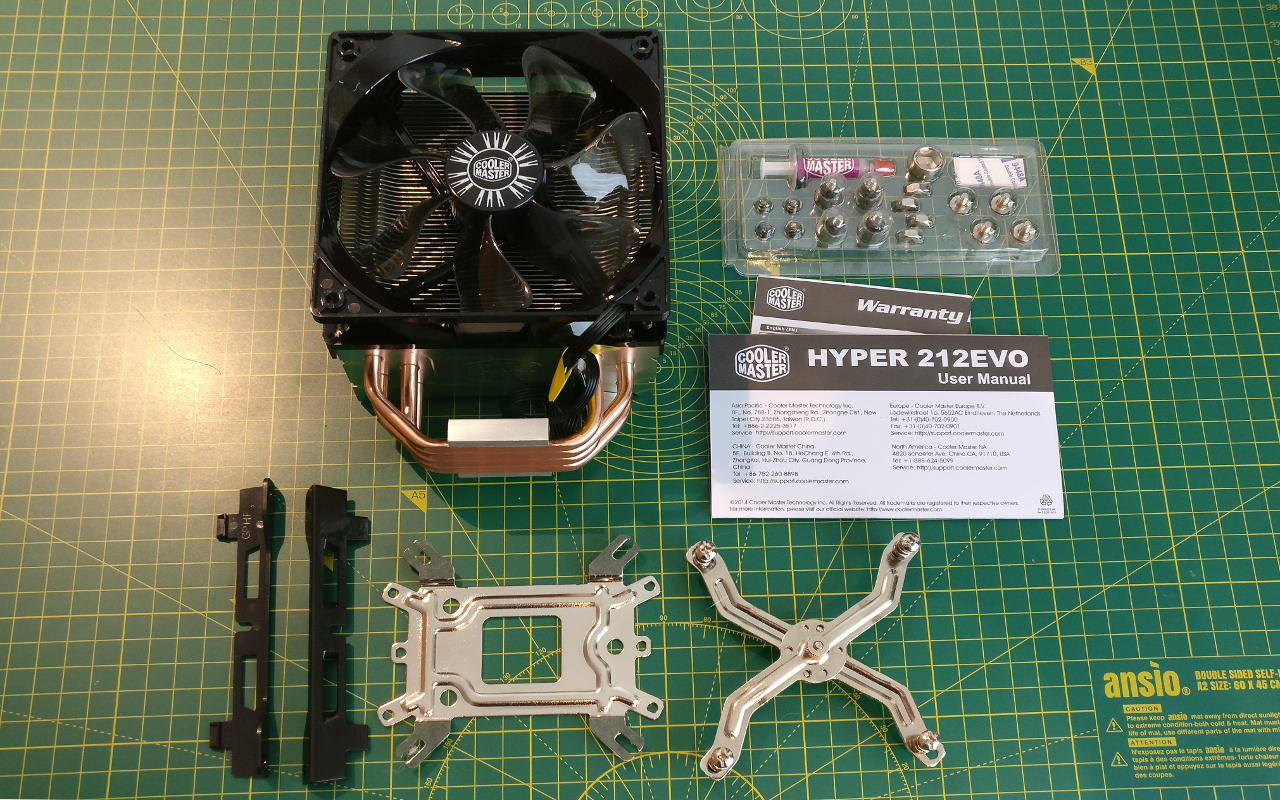
Cooler Master Hyper 212 EVO
Examining the thread size of the CPU cooler mounts on the motherboard showed them to be standard metric M3, and the screws on the cooler were also M3, but nowhere long enough to reach.
The standoffs that I had were too short and also not quite the right thread at the socket end (I suspect they are not actually M3), so I discarded that idea and destructively removed the circlips on the cooler mounting plate so I could replace the screws with much longer M3 bolts. Then I found that the M3 bolts that I had were too short – the ones that I thought were long enough were actually M4. So it was off to Amazon to see what was available on next day delivery. However, whilst looking, I found an assortment of M3 hex spacers for sale for £9.99 so bought those instead. Of course, I only found those after I had destructively removed the circlips. But that is partially the reason for this blog post – so others can learn from my mistakes.
The assortment came with 6mm, 10mm, 15mm, and 20mm standoffs, so I felt sure that one of those sizes would fit.

Brass Standoff Assortment
The USB 3.0 card had also arrived by now, so I fitted that and FreeNAS recognised it with no additional drivers needed, which was nice.
Whilst all this had been going on, the N40L had been up for sale on eBay, and it eventually sold for £79. Not as much as I had hoped for, but not a bad result I suppose, given it only cost £129+VAT (after cash back) in 2012. I’d been hoping for something closer to £100 though.
The next day, the M3 spacers arrived, so I continued the dry fit of the 212 EVO cooler.
I tried the 20mm standoffs first, but these sat flush with the bracket so that was no good. Likewise the 15mm didn’t give enough space for the cooler’s screws to have any tightening room. The sweet spot seemed to be the 10mm ones. So I went ahead and removed the heatsink on the CPU and fitted it for real.

Cooler Master Hyper 212 EVO fitment
Since I had removed the circlips, I substituted them for M3 washers instead. This made the fitting process way more fiddly than it needed to be and made me regret my impetuousness in removing the circlips unnecessarily. After several attempts with springs going ping (and fortunately found again) and washers falling off, and much cursing, I hit on the idea of screwing the standoffs onto the captive screws, which kept the springs and washers in place, and then screwed the whole lot into the motherboard sockets. This worked far better.
There was enough play in the springs that I think the 6mm standoffs would have worked equally well, if not better, but I did not feel like stripping it down again.
[Update: having now fitted another 212 EVO on another build with the same motherboard, I can confirm that 6mm is a little too short and that 10mm is the ideal length]
Finally it was all in place and tightened up, and I re-fitted the fan.
Upon booting, there was a RAM failure, but powering off, reseating the memory modules, and powering on again fixed this. I guess they got disturbed during the fitment of the cooler.
So it was all finished and working.

Finished system
Finally, the costings on this project…
[Note: For sales, Gross is what the buyer paid, including postage, whilst Net is what I was left with after all fees and postage costs]

Costs breakdown
As you can see, the costs spiralled a little, but I think it’s a pretty good system for the money. If I had not bought the four 4TB drives then it would have of course been a lot cheaper. And, honestly, I don’t think I needed as much RAM either. Nor the USB3 card.
I recouped some of these costs by selling the parts from the server – the PSU, the HDD caddies, the rails, the optical drive, the fans & fan housing, and the case itself.
[Update: In fact, I actually ended up getting more for the parts than the server had cost in the first place, which meant that the motherboard and CPU were effectively free!]
I also recouped some by selling the N40L and some other parts I had lying around.
So, we are done and I have a new NAS server. I shall call him George, and I shall love him and squeeze him and pet him and store files on him.
Updates
This is rather an ongoing project, so these updates have become a bit of a diary!
Update 1
I needed the Cooler Master 212 EVO for another build, so substituted it for an Arctic Freezer Xtreme Rev 2. You can see a report on this cooler in my next post (here).

Finished system, with Arctic Freezer Xtreme Rev2
A full report on the new build is available here.
Since the new build was cash positive, it mitigated the costs of this NAS build somewhat. In fact, had I not bought the new HDDs, the two projects together would have been cash positive overall.
Update 2
In October 2019 I replaced the four WD Red 4TB drives with Toshiba N300 8TB drives, and sold the 4TB drives on eBay.
Update 3
In April 2020 the PSU failed, and when I went to try to buy a like-for-like replacement from Novatech, I found that they had discontinued the model.
For future reference, I found that the Corsair RM850 was a suitable replacement. Although a little expensive, this does come with a 10 year warranty so could work out cheaper in the long run. The RM650 or RM750 would have been equally suitable but had a long lead time and I needed a replacement pronto.
NOTE: It is important to get an RM series and not an RMx (i.e. RM***x) as the ‘x’ variant only has one EPS connector and not the two that is needed here.
Update 3
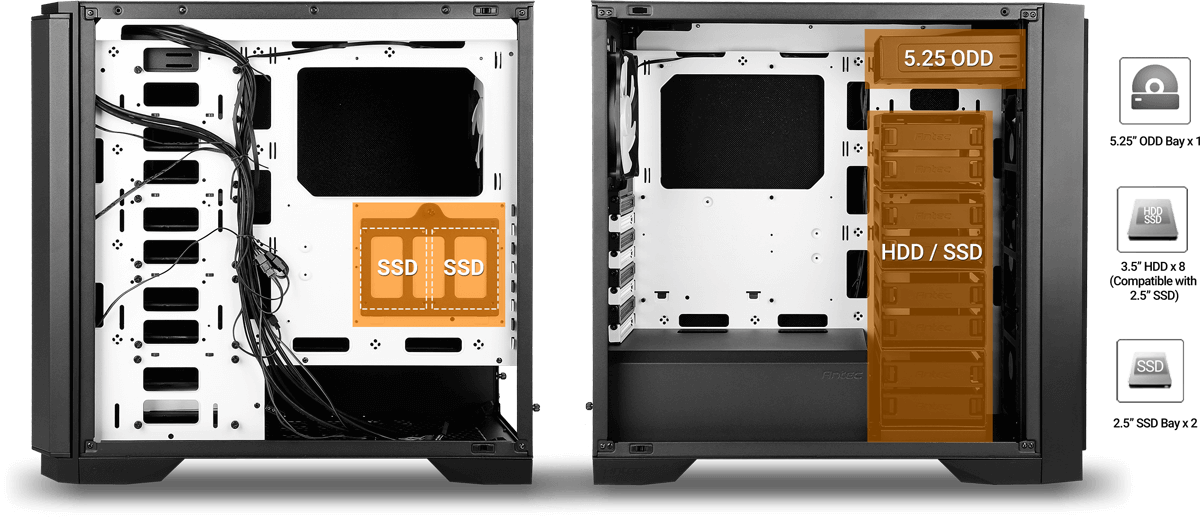
In October 2020 I replaced that horrid old case with a brand new Antec P101S Silent, which is much nicer, I must say!
All internal drive bays have caddies, although sadly there is no backplane so you have to manually connect the data and power cables for each drive. This means that a drive swap involves taking both side panels off. But it’s not too much of an inconvenience really, and the case was good value for money at £101.98 inc VAT.
Credit: Antec
Due to having caddies for all drives, the Lian-Li cage was therefore now surplus to requirements and I sold it on eBay. Even after fees etc., I turned a small profit on it. Which was nice.
Update 4
The WD Red 2TB drives are starting to die. I had a drive go in February 2021 (74,298 power on hours) and another in early April 2021 (75,510 power on hours). Both were manufactured in June 2012. I guess that’s not bad going.
I have replaced like-for-like (although the WD20EFRX is now branded as WD Red Plus rather than WD Red. It is really important that you don’t use the current generation of WD Red with a ZFS filesystem!)
There are two more 2012 drives still in the array, also in the 75,500 hour range, so I expect they will start to go soon too and need to be replaced.
I have decided that, since the onboard SAS controller is limited to 2TB drives, I may as well just keep this array as 2TB drives, hence the like-for-like replacement. I could increase the number of drives if I wanted – the controller supports up to 8 HDDs, and the 5.25 ODD bay in the new case can be removed and you can add an additional internal HDD cage to give an extra two HDDs, which means I could have a RAID-Z array of 6 x 2TB giving a 10TB array.
Update: I contacted Antec (who are based in Holland) and managed to source the aforementioned additional internal drive cage that replaces the 5.25″ ODD bay and gives an additional two 3.5″ internal bays. It cost €25 including VAT (£22.60 at PayPal’s exchange rate at the time), and I thought I could claim back the VAT but my accountant says that post-Brexit I cannot. Bummer. So that bay cost a rather whopping 25% of the cost of the case. Ouch.
Update 5
I have now updated the motherboard to a X8DTL-6F which you can read all about on a new post.
There will be no further updates on this post, as any further updates will now be made on that post.